Monday, August 24, 2009

Alison Rocks the Pasta


Good cooks and good looks run in the family.

Take my cousin Alison (shown at left in the photo above). She’s a goddess, natch.

She does social work down in Baltimore at a school. She’s married to John and has an amazingly adorable daughter, Olivia, who looks JUST LIKE her mom.

Alison is one of the sweetest people I’ve ever known. She loves to help others. She has amazing style and exquisite taste, which is why I know you'll want to learn her secrets to good eats.

Alison’s totally like my third sister. I miss her so much! We’re only a year apart. When we were kids, we were inseparable. She’d sleep over all the time. We’d hang. Go swimming. Try on clothes. Talk about boys. You know, usual girl stuff.

Thankfully, as adults we keep in touch pretty regularly. (Although it should be more, Alison. We can do better!) And, being the awesome cuz that she is, Alison typed up her Roasted Eggplant, Cherry Tomatoes and Penne recipe for my rockin’ blog, which prompts me to strongly encourage her, my other cousins and my darling sisters to send me your recipes! Come on. You know you want to. I have millions of fans out there dying to know what you cook.

So here’s her recipe. Alison comes up with awesome pasta dishes. She takes her pasta very seriously. I’m sure if she lived near me, we would host dozens of dinner parties together and be fabulous. And our husbands would clean up.

In the spirit of Alison, Mangia!

Roasted Eggplant, Cherry Tomatoes and Penne
Alison Sullivan

2 eggplants, quartered
2 cups whole cherry tomatoes (take a knife and puncture tiny holes in them so they don't explode while cooking)
Olive oil
Handful of basil
Penne or any type of pasta would do
Romano cheese

Preheat oven to 450 degrees. Toss the veggies with olive oil, salt and pepper and place them on a baking sheet. Roast for 30 minutes. While the eggplant and tomatoes are roasting in the oven, boil water for the pasta. Once the water is boiling, add the pasta and cook until al dente. Drain. Add all the veggies to the pasta along with more olive oil until glistening. Add the basil, cheese, and salt and pepper to taste. You can serve this warm or at room temperature.

Sunday, August 23, 2009

I Make a Mean Marinara


I’d rather starve than eat jarred marinara sauce.

I guess that’s not exactly a PC declaration, but sometimes the truth hurts.

Listen, I don’t judge those who groove on Prego or Ragu. Or eat at McDonald’s. Or go to Dunkin’ Donuts every day. Or buy all of their groceries in the frozen food aisle. Or think “homemade” is a “can of this” mixed with a “package of that.”

That’s just not how I roll.

OK. Maybe I do judge you.

I’m kidding! Calm down.

In my opinion, even the time-strapped have time to make a fabulous marinara. Prep and cleanup is about 10 minutes. The only attention you need to give marinara, besides some love, is occasional stirring as it simmers over majorly low heat so that it doesn’t burn.

And hello those 10 minutes and occasional stirs have a great payoff: You can just pop the finished product in the freezer for those nights when you’re way busy and would perhaps rather go for a frozen dinner (gag) or the drive-thru (ick nast).

And next time you buy a jar of marinara, read the label, particularly the sodium count.

Those numbers are pretty high, aren’t they?

I have a batch of marinara sauce simmering away as we speak. I’m using it for my fabulous stuffed bell peppers tomorrow night. OMG. I can’t wait.

Anyway, I guess you could say I make a Mean Marinara. That’s because it’s super spicy and garlicky. Those are my husband Mark’s two favorite flavors – next to chocolate and beer.

My recipe has a large dose of garlic and hot pepper flakes. It is not for those seeking mild flavors. Of course, you can cut back on those two ingredients if you please and are a major lightweight.

The uses for marinara are endless: Pasta, baked pastas, meat dishes like chicken parmesan, chili, stews, soups, vegetarian dishes like eggplant rolatini, dips for bread sticks and other appies like toasted ravioli. Yum, toasted ravioli.

So check out my recipe. And ditch the jar.


Mean Marinara

2 Tbsp. olive oil
1 small onion or half a medium/large onion, finely chopped
8 (yes 8) cloves of garlic, finely chopped
¾ tsp. red pepper flakes (you can cut back this)
1 can Cento pureed tomatoes (28. oz)
1 can Cento crushed tomatoes (28 oz.)
A little bit of water – probably half a cup
20 fresh basil leaves
Salt and pepper to taste

In a large pot, heat the olive oil over medium-low heat. Add the garlic and onion. Sweat the garlic and onion for five minutes. They should be very fragrant.

Push the garlic and onion to one side of the pan and toast the red pepper flakes for a minute. Mix into the garlic and onion.

Add the pureed and crushed tomatoes. Use a little bit of water to rinse off the tomato on the sides of the cans and pour into pot. (We Italians don’t like to waste food!) The water should measure to a half cup.

Add salt and pepper to taste. I did 20 grinds of my pepper mill and a scant 1/4 tsp. salt.

Snip basil leaves into pot with cooking shears.

Turn your heat down to low. Simmer partially covered for 45 minutes. Make sure you stir every 5 to 10 minutes.

Enjoy now or tomorrow or freeze for later on in your life.

Tips on Making a Family Cookbook


Those of you who know me, know this: I’m a recovering workaholic. For 10 years upon graduating college I thought it would be a good idea to work two jobs, six days a week.

For 10 years.

Thankfully, my dear husband noticed his wife was on the brink of insanity and suggested that it was probably wise to cut the jobs down to one.

After a good year of weighing the pros and cons of quitting my newspaper gig, my decision was made.

Adios deadlines and headlines and editorials and being the boss of people.

Hello to free time.

So, now I run a piano studio full time, which is so fantastically fabulous there are no words. Not to sound braggy, but it kind of feels like this Jersey Girl doesn’t really work.

But honestly, the workaholic still lives and breathes inside me. It wants to get out at all times.

So, I decided another venture was necessary.

My Family Cookbook.

This project was awesome. Granted, it took my about two years to complete it. (Look, I started it when I was working as an executive newspaper editor and teaching 25 piano students and cleaning my house and cooking and volunteering as corresponding secretary in the Woman’s Civic Club and…just, get off my back.)

The point is, the cookbook is completed. And it rocks my world. As well as the world of my beloved, awesome amazing family – immediate, in-law and extended.

How did we do it?

First of all, I held a party. I mean when it doubt, hold a party. That’s what Nigella or Martha would do.

I invited the fam, and they were instructed to bring a prepared dish as well as three recipes for our cookbook.

Pictures were taken. Food was tasted. Wine was consumed. And my sister Monica announced she was prego.

Good times.

Then, the real work began.

First of all, I’m not naming names, but some of my beloved family members did not follow my instructions. If you’re planning on making a cookbook for your family or friends, expect this to happen.

Why?

Well, many people cook from their head and heart. They don’t measure or time things. They just feel their cooking. Or, smell their cooking. Or, see their cooking. It’s so subjective. And many people aren’t comfortable with writing.

So, the investigative reporter in me had a big job to do. How do I take these amazing dishes that are a part of our lives and history, and share them with others so that they are understandable and doable?

I basically tracked down family members and interviewed them. They walked me through the recipes. Then, I had to write the recipes so that everybody else would understand.

Meanwhile, I typed, edited and organized all the other submitted recipes.

I also used a bazillion photos from various family events.

Designing the cookbook was very exciting for me, but I have 10 years of laying out newspaper pages. I can layout something blindfolded. If you have trouble with layout, sketch out a design. Or, look at other cookbooks for layout ideas. You want the format to be easy to read. And big, colorful pictures always catch the eye.

Fortunately, my dad was able to print up my cookbooks through his work so they look amazingly professional.

But, there are many companies online who publish family cookbooks.

Here are a few:

http://www.cookbookpublishers.com/?source=adwords&gclid=CJL4zLq9upwCFQxM5QodGwT3ow

http://createmycookbook.com/home?gclid=CISh6sS9upwCFU1M5Qodb1T7ow

http://www.heritagecookbook.com/

I wanted to share with you a recipe from our family cookbook.

I’m in a retro mood from watching “Mad Men” this week, so I thought my mom’s blue cheese ball would be perfect. This is such a throwback. If you love blue cheese, you have to make this dish. It appears at every holiday party in my family.

Blue Cheese Ball
Judy Watson

8 oz. cream cheese, softened
8 oz. blue cheese
¼ cup butter or margarine, softened
1 tsp. minced chives
1/3 cup chopped black olives, drained
¼ cup chopped walnuts (optional)

Crumble blue cheese into a bowl. Mix with cream cheese, butter and chives. Add chopped black olives and mix together. Form mixture into a ball. Roll in chopped walnuts if desired. Serve with crackers.

Sunday, August 9, 2009

Bruschetta Makes the World Betta


It’s not everyday when The Husband requests a no-meat meal.

I feel like the crazy aunt in “My Big Fat Greek Wedding” when he says these things.

“Whaddya mean you-a eat-a NO MEAT!?!?!”

Such was the case one lovely day this week when I declared to my loving one and only that he could decide what’s for dinner. After the shock and awe dissipated, I got to work crafting a plan:

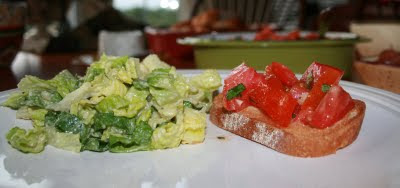
Caesar Salad aka Mark’s fav
Tomato Bruschetta
A roasted rep pepper concoction. And this was my opportunity to roast the peppers myself. See post below.
Mozzarella and prosciutto – just for kicks. I know he said no meat, but I know my husband way better than you. He loved the prosciutto.

Mark said the dinner was just what he was hoping for.

So, mission accomplished.

That husband… always surprising me after almost six years of married bliss. Don’t get me wrong, he eats a ton of fish. But meat of any variety is pretty much up there on his menu priority list.

Of course, I was thrilled with his off-kilter suggestion. I’m always devising ways to get him to eat more food that has roots and comes from the earth.

So, it was good day.

I thought I would share my Tomato Bruschetta recipe with you, since the time is now to enjoy our delish Jersey tomatoes.

You can serve this at a summer party or have it as an appetizer.

Tomato Bruschetta

3 ripe tomatoes, diced
2 cloves garlic, chopped
2 Tbsp. good olive oil
12-15 basil leaves, chopped
Salt and pepper to taste


Combine all the ingredients in a bowl. Serve with garlic toasts.

Garlic toasts:

Crusty Italian bread, sliced
1 clove of garlic, smashed.

Rub garlic on each side of sliced bread. Place bread on a baking sheet. Put under hot broiler until each side is toasted.

Anyone Can Roast a Pepper


Sometimes, cooking is a surprise.

I always believed roasting peppers would be terribly difficult, even though cooking show hosts always say it isn’t.

So, I thought it was high time I get over my fear and just go for it!

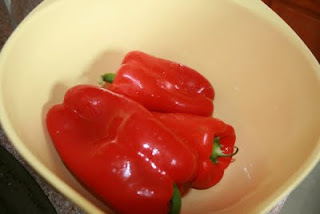
With delish August red peppers in hand, I roasted away.

And, I successfully did so without causing the smoke alarm to go off.

Score!

Too bad I was home alone. Normally I DO make the smoke alarm go off during my culinary tasks while my husband Mark is up in the Man Room trying to get work done. Or let’s be real, he’s probably researching fantasy football stats on ESPN.com.

So, there’s a few different ways to roast up a pepper. I followed a combination of tips from Mario Batali and Lidia Bastianich. Love them.


Mario said to oil up your peppers. I used three big red peppers with 2 Tbsp. extra virgin olive oil.


I placed the three peppers on a baking sheet and put them under the broiler on high. Once the top blackens, take out the tray and flip the peppers over to blacken the other side. Be careful when you take the tray out of the oven, because the hot oil jumps all around. I also don’t recommend doing this if you JUST cleaned your oven. You’ll be cursing at yourself.


Anyway, once they’re all roasted up, Lidia says to put them in a bowl and cover the bowl with a piece of plastic wrap for an hour. So, I did that.

Then, when the peppers are all cooled, the skin peels right off. You take the stem and seeds out and slice away. This is a slimy process, be warned.

I made Mario’s Marinated Roasted Peppers with Goat Cheese and Olives from his Molto Italiano cookbook. The dish was molto fab. I omitted the olives, because my eating partner in crime, The Husband, doesn’t groove on olives.

The dish was very tasty, and so was the goat cheese from Bagliani’s.

Besides making a really yum-yum dish, I learned a valuable lesson – making roasted red peppers really isn’t hard.

Time-consuming, yes. Tricky, no.

Homemade Ice Cream Worth the Effort


I’m not what you call an ice cream person.

Meaning: I could probably go for years upon years without ice cream and think all is right with the world.

Pasta, sushi, chocolate, coffee, wine, cheese. Well, these food groups are needed for my survival.

But whether you eat ice cream every night while watching TV or once in a blue moon, you seriously need to try homemade ice cream.

I know your cynical self is thinking, “Why, Susan, why?? There are thousands of flavors and brands and sizes and styles of ice cream found any time, any place in the U.S.”

This is so true, but once you taste the insane fabulousness of homemade ice cream you will be converted. Plus, everybody who has tasted my homemade ice cream LOVES it. I mean, put a bowl of it in front of your dinner guests and they will think you are a total culinary rock star. And it’s not like the process requires intensive labor as it did back in the 1800s. A machine is doing all the work.

So how does a gal who really doesn’t eat very much ice cream conclude that she must purchase an ice cream maker and make delicious concoctions with it?

I had been on the fence about it for many months, when two key events took place:

First, Macy’s put the Kitchenaid ice cream maker on sale. It attaches to my Kitchenaid mixer, and it’s stored in the freezer so it’s pretty much awesome.

Then, a panel discussion was held with two experts in the field: My then 5-year-old and 8-year-old nieces. When asked if Aunt Suzie should purchase an ice cream maker, the two girls declared firmly while jumping up and down, “YES!”

It was as if God was sending me a message.

So my mission was clear.

With ice cream maker in hand, I set about my task: Chocolate chip ice cream.

Honestly, the end result is pure divinity. It’s so fresh and so clean unlike store-bought containers.

As a result of owning an ice cream maker, I now eat more ice cream – at home. Thanks to my God-given food allergy to nuts, I avoid ice cream parlors like the plague. They usually have friendly signs saying that cross-contamination is happening in big, red all cap letters. So, I just don’t go there.

Below is my Super Duper Chocolate Chip Ice Cream recipe. And for the record it is the perfect accompaniment for homemade brownies. I basically take the Betty Crocker old-school spiral bound cookbook recipe for vanilla ice cream and add mini chocolate chips.

In addition, I do splurge on my vanilla products, especially for something like ice cream, where the flavors are the star of the show. I highly recommend Nielsen-Massey vanilla paste for my ice cream. I’ve also used the Nielson-Massey vanilla, but the paste provides those old-timey flecks of vanilla bean throughout the ice cream that I love. The paste is $11 a pop and the extract is $19. The products are available at Sur la Table and Williams-Sonoma.

Making ice cream isn’t difficult, but it does take many hours of cooking, chilling out and waiting. But in our hectic world, you need to learn to relax in the kitchen. It is so worth it!

Super Duper Chocolate Chip Ice Cream

3 extra large egg yolks, slightly beaten
½ cup sugar
1 cup whole milk
¼ tsp. salt
2 cups heavy whipping cream
1 Tbsp. vanilla paste or extract
1/3 cup mini chocolate chips

Before you begin, chill a glass bowl in the freezer for an hour.


Mix egg yolks, sugar, milk and salt in saucepan. Cook over medium heat stirring constantly. Right when it starts to bubble, take it off the heat.


Pour the mixture into your chilled bowl. Refrigerate uncovered for at least three hours.


Stir whipping cream and vanilla into milk mixture. Pour into a 1-quart ice cream maker and freeze according to manufacturer’s directions. Stir in the chocolate chips.

Scoop mixture into a container and place in the freezer for desired firmness. In my opinion, it’s good to go in about an hour in the freezer.