Monday, December 30, 2019

Party Dip Oh Yeah

This White Bean Dip with Pita Chips makes a frequent appearance at my get-togethers. First of all, it's a quick vegetarian dish to have on hand. The dip can totally be made the day before.


You certainly can skip the homemade pita chips and just buy a bag, but the homemade chips are always a hit. The oregano on the chips works perfectly with the dip.

Do keep a close eye on the oven when making the chips as each oven is different, and I have found that different brands of pita cook faster or slower than others.

I like to use Cento beans, which are actually a 19-ounce can. I just up the lemon juice and olive oil to accommodate. I love the green of the parsley in this dip. It adds a nice brightness. This is also a good one to make if any of your guests have an allergy to sesame, which is often present in traditional hummus.


White Bean Dip with Pita Chips
From "Everyday Italian"
By Giada DeLaurentiis
Makes 6 appetizer servings

4-6 pita breads, cut into 8 triangular wedges
2 Tbsp. plus 1/3 cup olive oil
1 tsp. dried oregano
Salt and freshly ground pepper to taste
1 (15 ounce) can cannellini beans, drained and rinsed
1/4 cup flat leaf parsley
2 Tbsp. fresh lemon juice
1 garlic clove

To make the pita chips:
Preheat oven to 400 degrees Fahrenheit. Arrange the pita wedges over a large baking sheet. Drizzle the pita wedges with 2 Tbsp. olive oil, then sprinkle with oregano and salt and pepper to taste. Toss and spread out evenly over baking sheet. Bake the pita wedges for 8-12 minutes, checking on them at the 4-5 minute mark, and tossing them to redistribute on the pan before returning the pan back to the oven to finish baking. Be sure to keep a close eye on the chips!

To the make the puree:
Meanwhile, in the bowl of a food processor, combine the beans, parsley, lemon juice, garlic, and salt and pepper to taste. Pulse on and off until the mixture is coarsely chopped. With the machine running, gradually mix in the remaining 1/3 cup of oil until the mixture is creamy. Season the puree with salt and pepper to taste if desired. Transfer the puree to a small bowl and serve the pita toasts warm or at room temperature alongside. (The pita wedges and bean puree can be made 1 day ahead. Store the pita wedges airtight at room temperature. Cover and refrigerate the bean puree.)

Sunday, December 29, 2019

Your New Fave Din

Here's an easy peasy chicken din: Grilled Chicken with Basil Parsley Sauce. It is literally my son's favorite dish right now. He asked if I could make it every day. He ate three servings of this the first night, and all of the leftovers the second night.


As long as you remember to marinate the chicken at least thirty minutes ahead, you are good to go. This uses thin cut chicken breast so it cooks up super quick. Just make sure you cook it in batches because overcrowding your grill pan is no bueno. Your chicken will end up poached rather than grilled.

I always keep fresh basil on my windowsill and parsley in my veg drawer so making this is a cinch. It goes great with pasta, rice, a salad. Whatevs!

And you can make the basil parsley sauce ahead as well. I'm a big big fan of make-ahead things because I like to have as much cleaned in the kitchen before I sit my bootie down to actually eat. One of my OCD qualities. For sure.

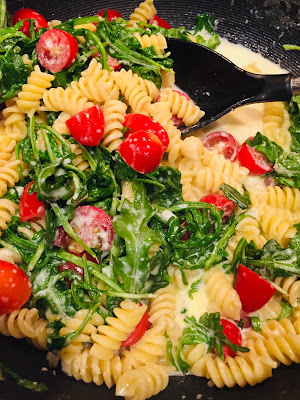
When I made this, I served the super amazing Lemon Fusilli with Arugula by Barefoot Contessa.


Link to that awesomeness is here: Lemon Fusilli with Arugula

And here's the chicken recipe below!


Grilled Chicken with Basil Parsley Sauce
Makes 3-4 servings

For the chicken:
6-8 thin-cut boneless, skinless chicken breast
2 tsp. fresh thyme, minced or 3/4 tsp. dried thyme
Juice from 1 lemon, about 3 Tbsp.
1/4 cup extra virgin olive oil
Salt and pepper to taste

In a glass bowl, whisk together thyme, lemon juice, olive oil and salt and pepper to make a marinade. Place chicken breasts in the bowl. Coat the chicken with the marinade. Cover with a lid or plastic wrap. Set in refrigerator for at least 30 minutes up to 8 hours.


When ready to cook, place a grill pan over medium high heat. Grill chicken in batches about 4 minutes per side. Chicken should be nicely browned and cooked through. Set aside cooked chicken in a covered dish while grilling the second or third batch.


Serve immediately or at room temp with the sauce listed below.

Basil Parsley Sauce
1cup fresh basil
1/2 cup flat leaf parsley
1 garlic clove
Zest and juice of one lemon
1/2 cup extra virgin olive oil
Salt and pepper to taste

In a blender or a food processor, place basil, parsley, garlic clove, lemon zest and juice, olive oil and salt and pepper. Puree until smooth. Scrape sides if necessary and puree again for 20 seconds. Adjust seasonings if necessary.


To serve: Plate a slice of chicken with a tablespoon or two of the bright basil parsley sauce. Devour!


Thursday, December 19, 2019

Nigella Christmas Chocolate Cookies

I've been wanting to make Nigella Christmas Chocolate Cookies for years. But this time of year is always so hectic, and each December would come and go and I just cranked out my cookie standbys: pizzelles, biscotti, ricotta, chocolate chips.

So this week, I changed all that and made a point to get to it already. Afterall, procrastination and putting tasks off is not how I roll.

These are like a chocolate shortbread drizzled with a chocolate glaze and sprinkled with your favorite Christmas sparkles or confetti.

I'm glad I made them. They are a nice surprise.

My batch made closer to 30 than the 24 listed in the recipe.

The recipe is featured in the Nigella Christmas cookbook. Nigella Lawson is one of my fave celebrity chefs and I collect all of her books. If you are not an avid reader of Nigella Lawson recipes, you may be surprised by her style as it is quite colorful and she adds a bit of her own commentary. I have listed her recipe exactly as it is written in the book.

My tips for the cookies that may have differed from her recipe are as follows:
1. I did not wear rubber gloves to roll out the dough. And it was totally just fine.
2. I did not remove my cookie sheet from the oven to place on a cold a surface. I don't even know what that means. Ha. Maybe her fancy kitchen has ice cold marble surfaces on which hot cookie sheets can be placed? I used a standard cooling rack on my common man formica.
3. My yield was greater than 24, so you may want to have 3 cookie sheets prepared.
4. Just in case it's not clear for you in her recipe, please bake each sheet one at a time.


Christmas Chocolate Cookies
From "Nigella Christmas"
By Nigella Lawson
Makes approximately 24

2 1/4 sticks (18 Tbsp.) soft unsalted butter
3/4 cup sugar
1/3 cup unsweetened cocoa powder
2 cups all-purpose flour
1/2 tsp. baking soda
1 tsp. baking powder

For the Festive Topping:
2 Tbsp. unsweetened cocoa powder
1 1/2 cups confectioners' sugar
1/4 cup boiling water, from a kettle
1 tsp. vanilla extract
Christmas sprinkles

Preheat the oven to 325 degrees Fahrenheit and line  2  cookie sheets with parchment paper.

Cream the butter and sugar in a bowl and when you have a light, soft, whipped mixture, beat in the 1/3 cup cocoa powder (sifting if it is lumpy) and, when that's mixed in, beat in the flour with the baking soda and baking powder. Or just put everything in the processor and blitz, if you prefer.

This mixture is very soft and sticky and I find it easiest to form the cookies wearing my disposable vinyl gloves, so pinch off pieces about 1 Tbsp. in size, roll them into balls, then slightly flatten into fat discs as you place them well spaced on your cookie sheet. You should get about 12 on at a time.

Bake each batch for 15 minutes; even though the cookies won't feel as if they've had enough time, they will continue to cook as they cool. They will look slightly cracked on top, and it's this cozy, homespun look that I love.


Remove the cookie sheet to a cold surface and let it sit for 15 minutes before transferring the cookies to a wire rack, with a sheet of newspaper under it to catch drips while topping them.

To make the topping, put the cocoa powder, confectioners' sugar, water and vanilla extract into a small saucepan and whisk over a low heat until everything's smoothly combined. Take off the heat for 10 minutes.


When the cookies are cool, drizzle each with a tablespoonful of chocolate glaze - to glue the sprinkles on in a minute - using the back of the spoon to help spread the mixture, though an uneven dribbly look is part of their charm. After you've iced 6 cookies, scatter with some of the Christmas sprinkles, and continue thus until all the cookies are topped. If you ice them all before sprinkling, you will find the cocoa "glue" has dried and the sprinkles won't stick on.

Sunday, December 15, 2019

Buttermilk Cheddar Biscuits

Fresh baked goods are one of the greatest things ever, in my humble opinion. So, whenever I have a moment to whip up a fresh batch of anything, I go for it.


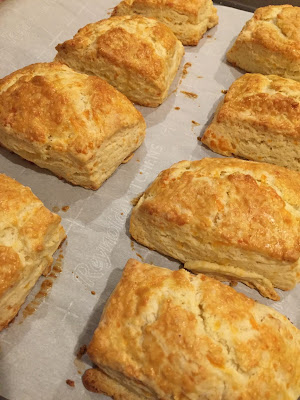
These Buttermilk Cheddar Biscuits are totally amazing. The recipe is a Barefoot Contessa from her cookbook called "Back to Basics."

Now, buttermilk is not an ingredient I have on the ready like ever. But, you can make up your own buttermilk substitute on the fly with regular old milk and a lemon. Simply measure out a scant 1 cup of milk and add 1 Tbsp. fresh lemon juice. Stir and let it hang out for 5 minutes. Voila. Buttermilk. For this recipe, you just need a half cup of buttermilk.

I made these biscuits the last time I made a buffalo chicken salad. Here's a pic:


 Link to that awesome recipe is here: Buffalo Chicken Salad

These biscuits would obviously rock with a brunch situation. I also feel like they would be amazing with a chowder or a stew or if you're whipping up a baked ham din.

You can totally use pre-shredded cheese. That's what I did (sorry, Ina.). Totally top each biscuit with a pinch of flaky sea salt. It's the ultimate finishing touch. They are so super amaze. You will definitely eat a whole bunch. I love this recipe because each biscuit looks unique. I love the whole misshapen quadrangle situation that is going on. Yay!

Here's a pro tip with the butter. Cut it into cubes and just leave it on the butter wrapper to easily dump it into the mixing bowl. I like to chop the butter first and put it back in the refrigerator to keep it super cold for biscuits and pie crusts. Then I measure out all my other ingredients. When it's time to make the dough, just pop out your cubed butter from the fridge. Gotta be prepared! And you totally do not want soft butter for flaky perfect biscuits.


Here's the recipe for the biscuits:

Buttermilk Cheddar Biscuits
Makes 8 biscuits
From "Barefoot Contessa: Back to Basics"
By Ina Garten

2 cups all-purpose flour, plus a handful
1 Tbsp. baking powder
1 1/2 tsp. kosher salt
12 Tbsp. (1 1/2 sticks) cold unsalted butter, diced
1/2 cup cold buttermilk, shaken
1 cold extra large egg
1 cup grated extra sharp Cheddar
1 egg beaten with 1 Tbsp. water or milk
A sprinkle of sea salt

Preheat the oven to 425 degrees Fahrenheit.

Place 2 cups flour, the baking powder and kosher salt in the bowl of an electric mixer fitted with the paddle attachment. With the mixer on low, add the butter and mix until the butter is the size of peas.

Combine the buttermilk and egg in a small glass measuring cup and beat lightly with a fork. With the mixer still on low, quickly add the buttermilk mixture to the flour mixture and mix only until moistened. In a small bowl, mix the cheddar cheese with a small handful of flour and, with the mixer on low, add the cheese to the dough. Mix only until roughly combined.


Dump out onto a well-floured board and knead lightly about six times. Roll the dough out to a rectangle 5 by 10 inches.


With a sharp, floured knife cut the dough lengthwise in half and then across in quarters, making 8 rough rectangles. Transfer to a baking sheet lined with parchment paper.


Brush the tops with egg wash, sprinkle with sea salt and bake for 20 to 25 minutes, until the tops are browned and the biscuits are cooked through. Serve hot or warm.