Thursday, August 27, 2020

Nut Free Pesto

 My family has always made pesto - a tasty puree featuring basil - without nuts. This is good news for me, since I've been deathly allergic to nuts since early childhood. 

I'm sharing with you the way my family does it since your basil plants may be bursting with gorgeous leaves currently.

To clean such a large quantity of basil needed for pesto (about 2 cups), place leaves in a colander and rinse under cool water. Spread out on a sheet pan to dry. This may take a few hours


This puree is perfect for making a pasta sauce with pasta water, olive oil and a splash of cream. It also is fantastic to swirl into melted butter and olive oil to top on day-old bread to make the best garlic bread ever. Literally. Just remember a little goes a long way. A tablespoon or two provides enough flavor for most dishes. 

You can also use this pesto when you are making marinara or meatballs and sauce in the winter, when it may be hard to find fresh basil at the store.

Store it in the freezer in ice cube trays for perfect portion sizes.


Pesto Jersey Girl Style (No Nuts!)

Yields 1/2 cup

2 cups fresh basil leaves

1/4 cup extra virgin olive oil

2 cloves garlic

1/4 cup grated parmigiano cheese

A pinch of salt

Freshly ground black pepper

In a bowl of a food processor, add all ingredients. Process until smooth. Add more olive oil if necessary. Store in refrigerator in a sealed container for up to 3 days or freeze for up to six months. You may freeze in ice cube trays for pre-made portions.


Tuesday, August 25, 2020

Going Green Mexican Style

There's waaaay more to Mexican food than tacos. And I love discovering all the different foods of this cuisine. I'm so excited to share with you this Charred Chili Relleno with Green Rice recipe. Packed with vegetables and flavor, this dish is totally delish and good for you! And it is slightly fancy pants, which I super duper love.

This is a pretty lengthy recipe so be sure to read it through before working on it. It comes from Rachael Ray's cookbook called "Just in Time." As I find with many Rachael Ray recipes, this one takes a bit longer than 30 minutes to make. Just a little heads up for you!

First off, chili relleno is simply Spanish for stuffed pepper. I thought you should know!

If you have trouble finding poblano peppers, you can also use cubanelle peppers. And of course, you can omit the jalapeno if you aren't a fan of spicy. I often use a can of regular diced tomatoes instead of fire-roasted. I just always have diced on hand.

This is nice when you are in the mood for Mexican but are trying to keep it a meatless meal. The peppers and corn are currently in season, so this a great time to make this dish, although I make it anytime of year.

I served these poblanos with green rice with a citrus marinated chicken (for the sake of my son), and a salsa fresca. Below is the recipe for the peppers and rice. Enjoy!


Charred Chili Relleno with Green Rice

From "Rachael Ray: Just in Time!"

By Rachael Ray

Makes 4 servings 

4 cups chicken or vegetable stock

1 bay leaf

2 cups white rice

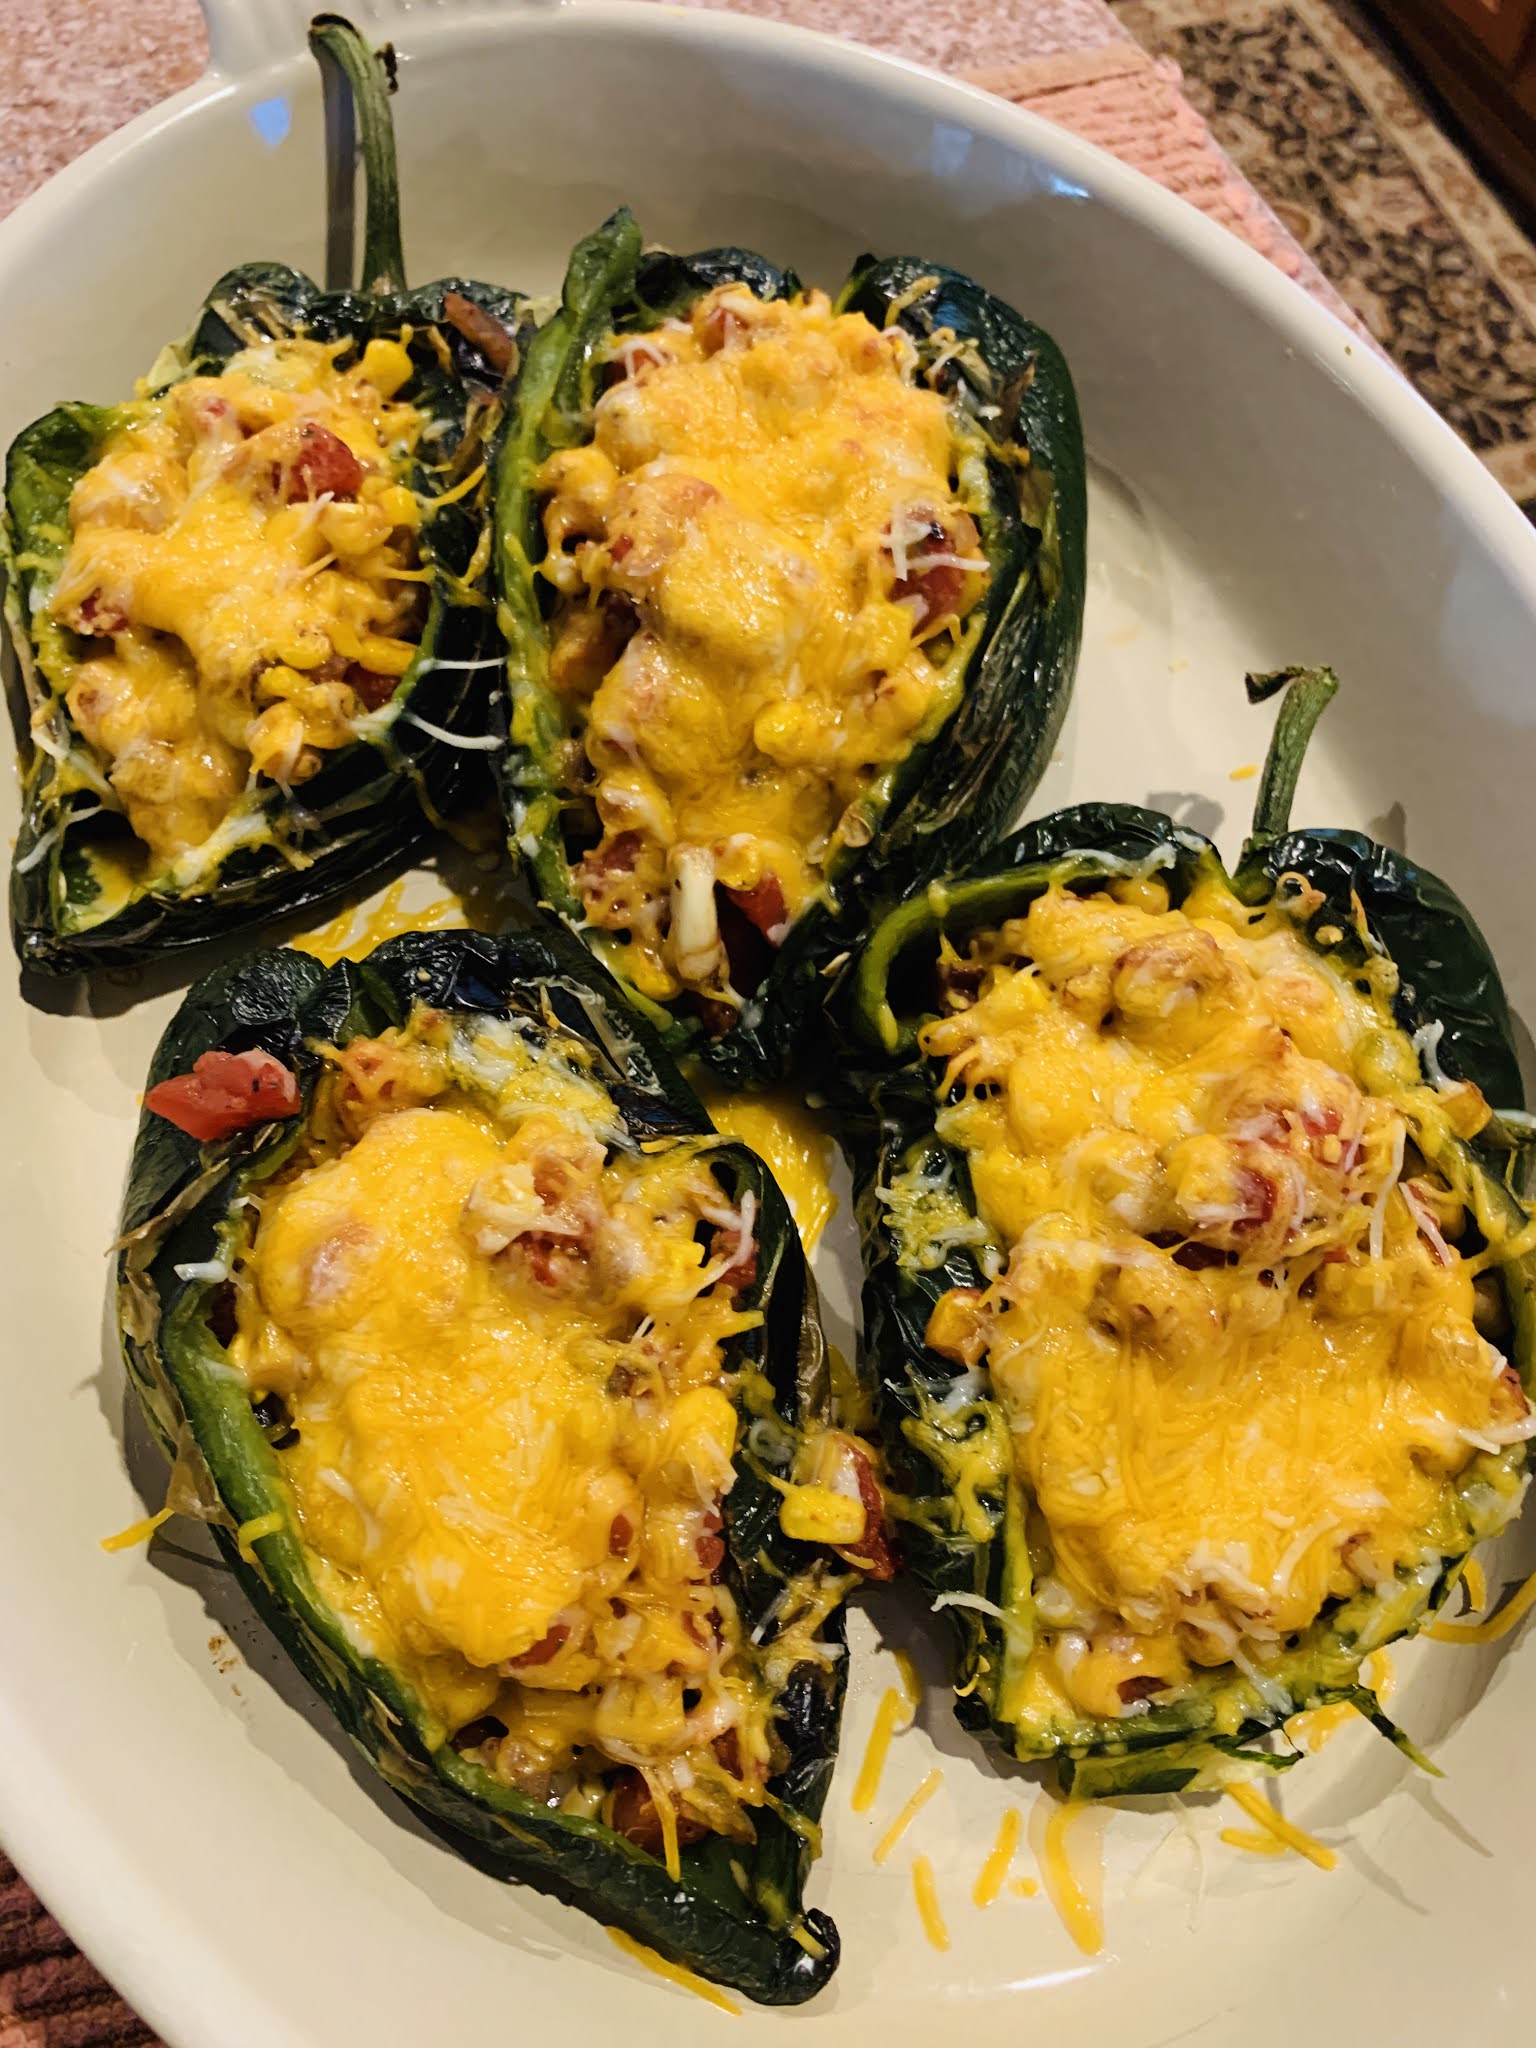
4 large poblano peppers

4 to 5 ears or 3 cups frozen corn kernels

3 Tbsp. canola or vegetable oil

1 red onion, chopped

1 jalapeno, seeded and chopped

4 garlic cloves, chopped

1 28-ounce can diced fire-roasted tomatoes, drained well

1 1/2 tsp. cumin

1 tsp. dried oregano

Salt and pepper

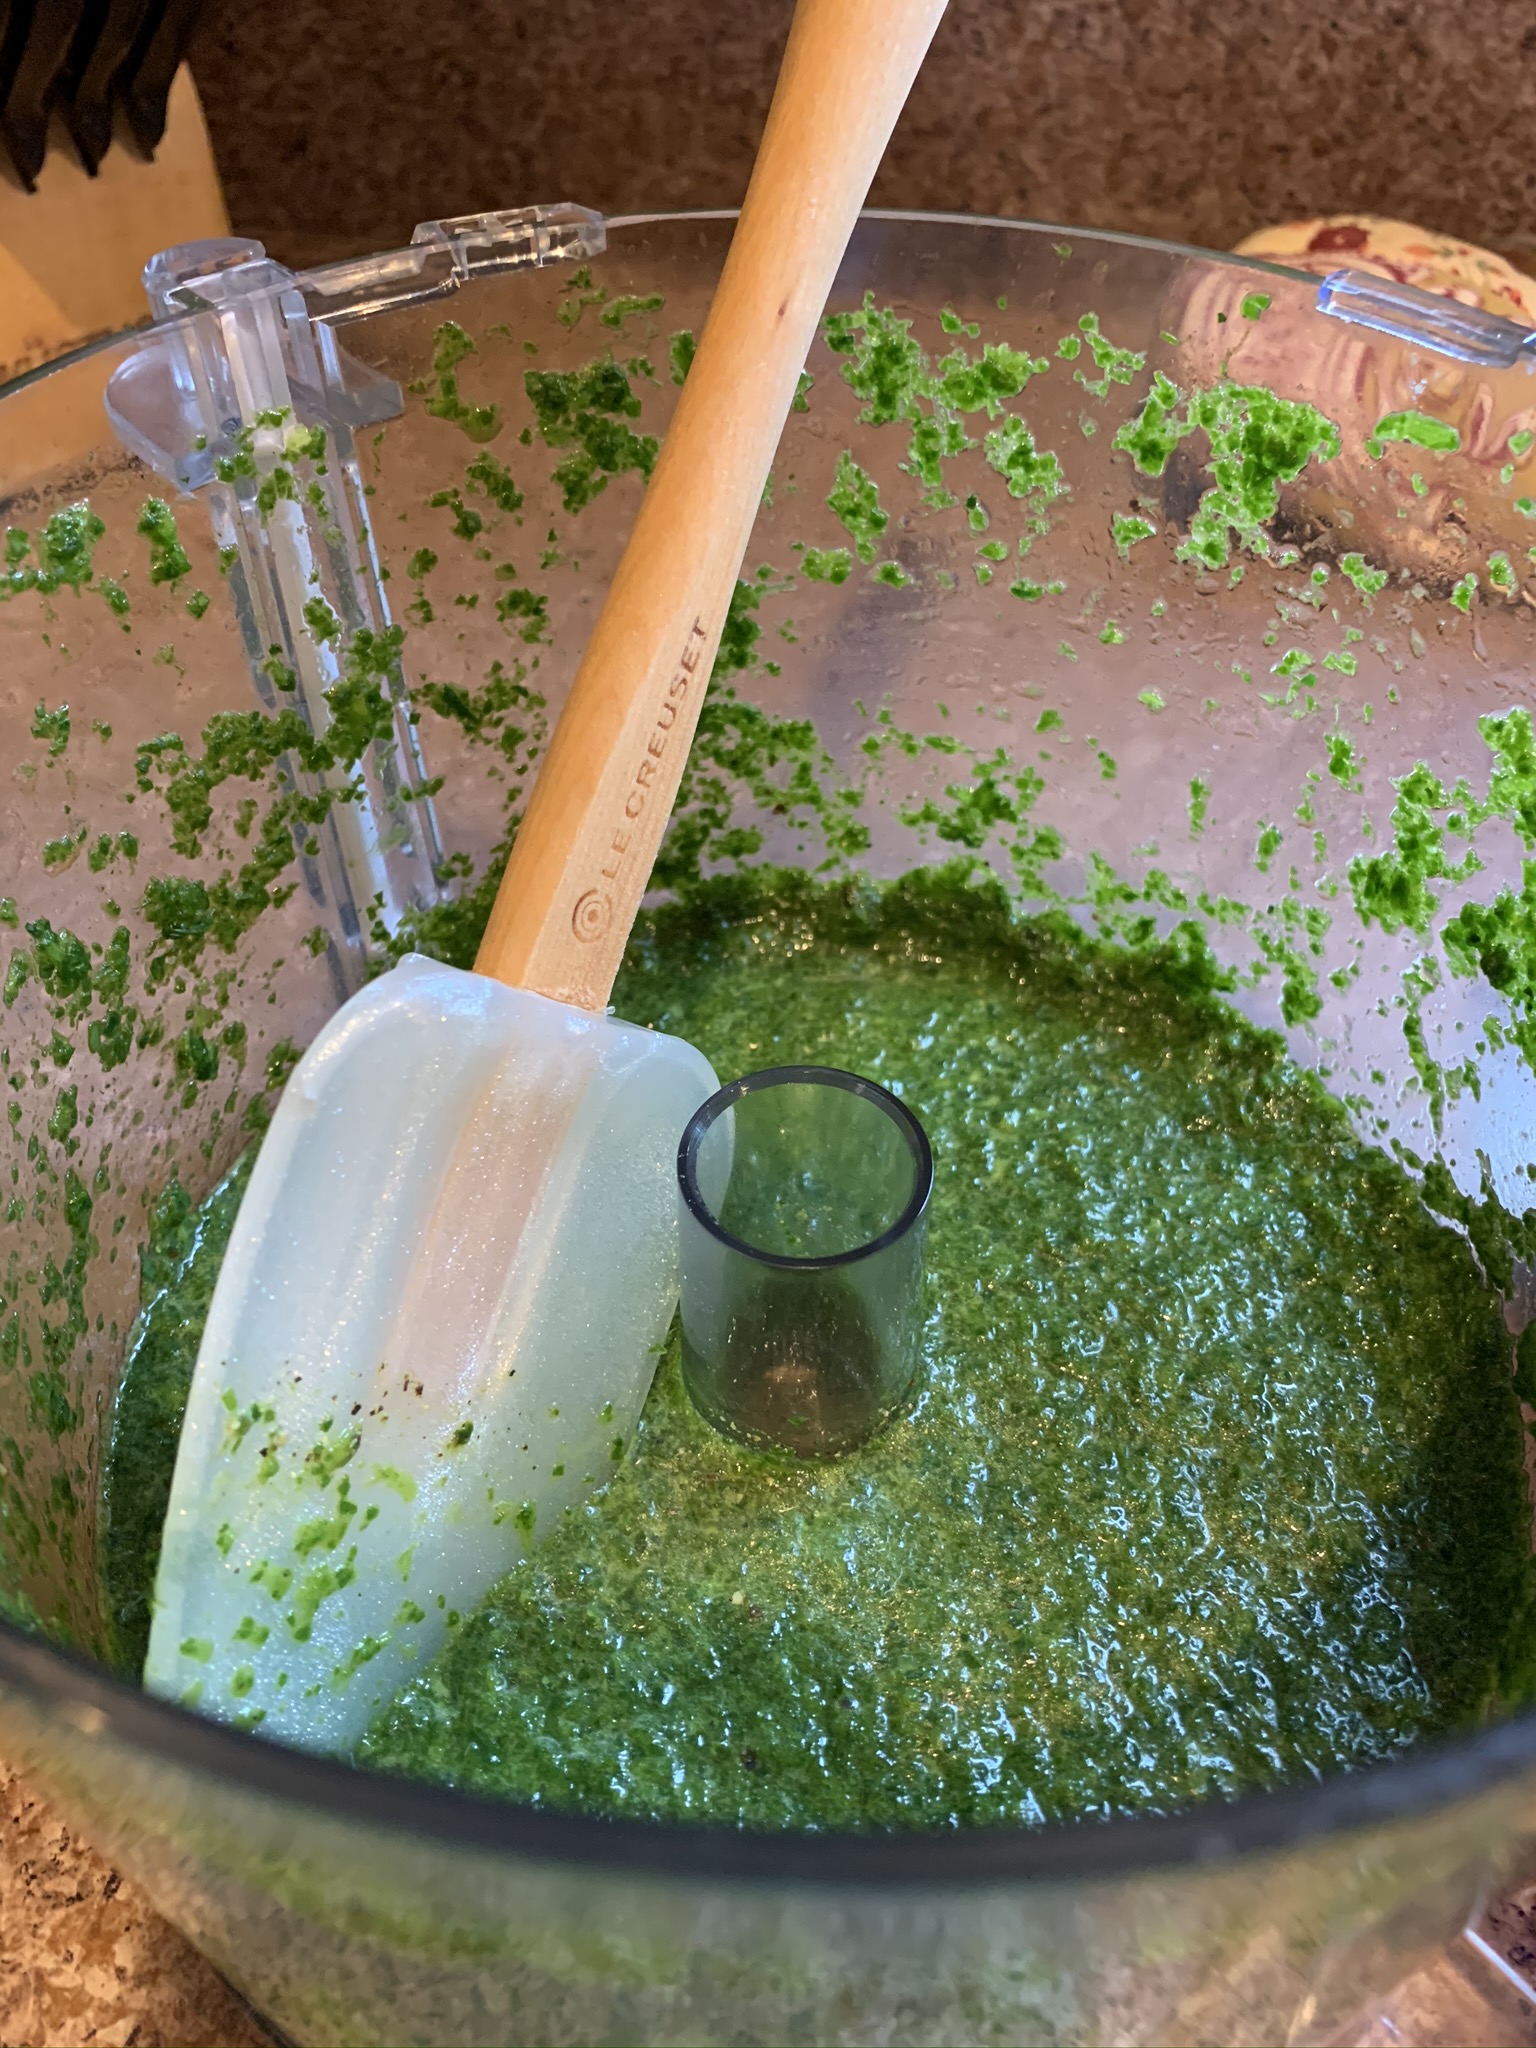
1/2 cup cilantro leaves

1 (10 ounce) sack of baby spinach

4 scallions, coarsely chopped

Zest and juice of 1 lime

1 cup shredded Chihuahua or Monterey Jack cheese

Preheat the broiler or a grill pan to high.

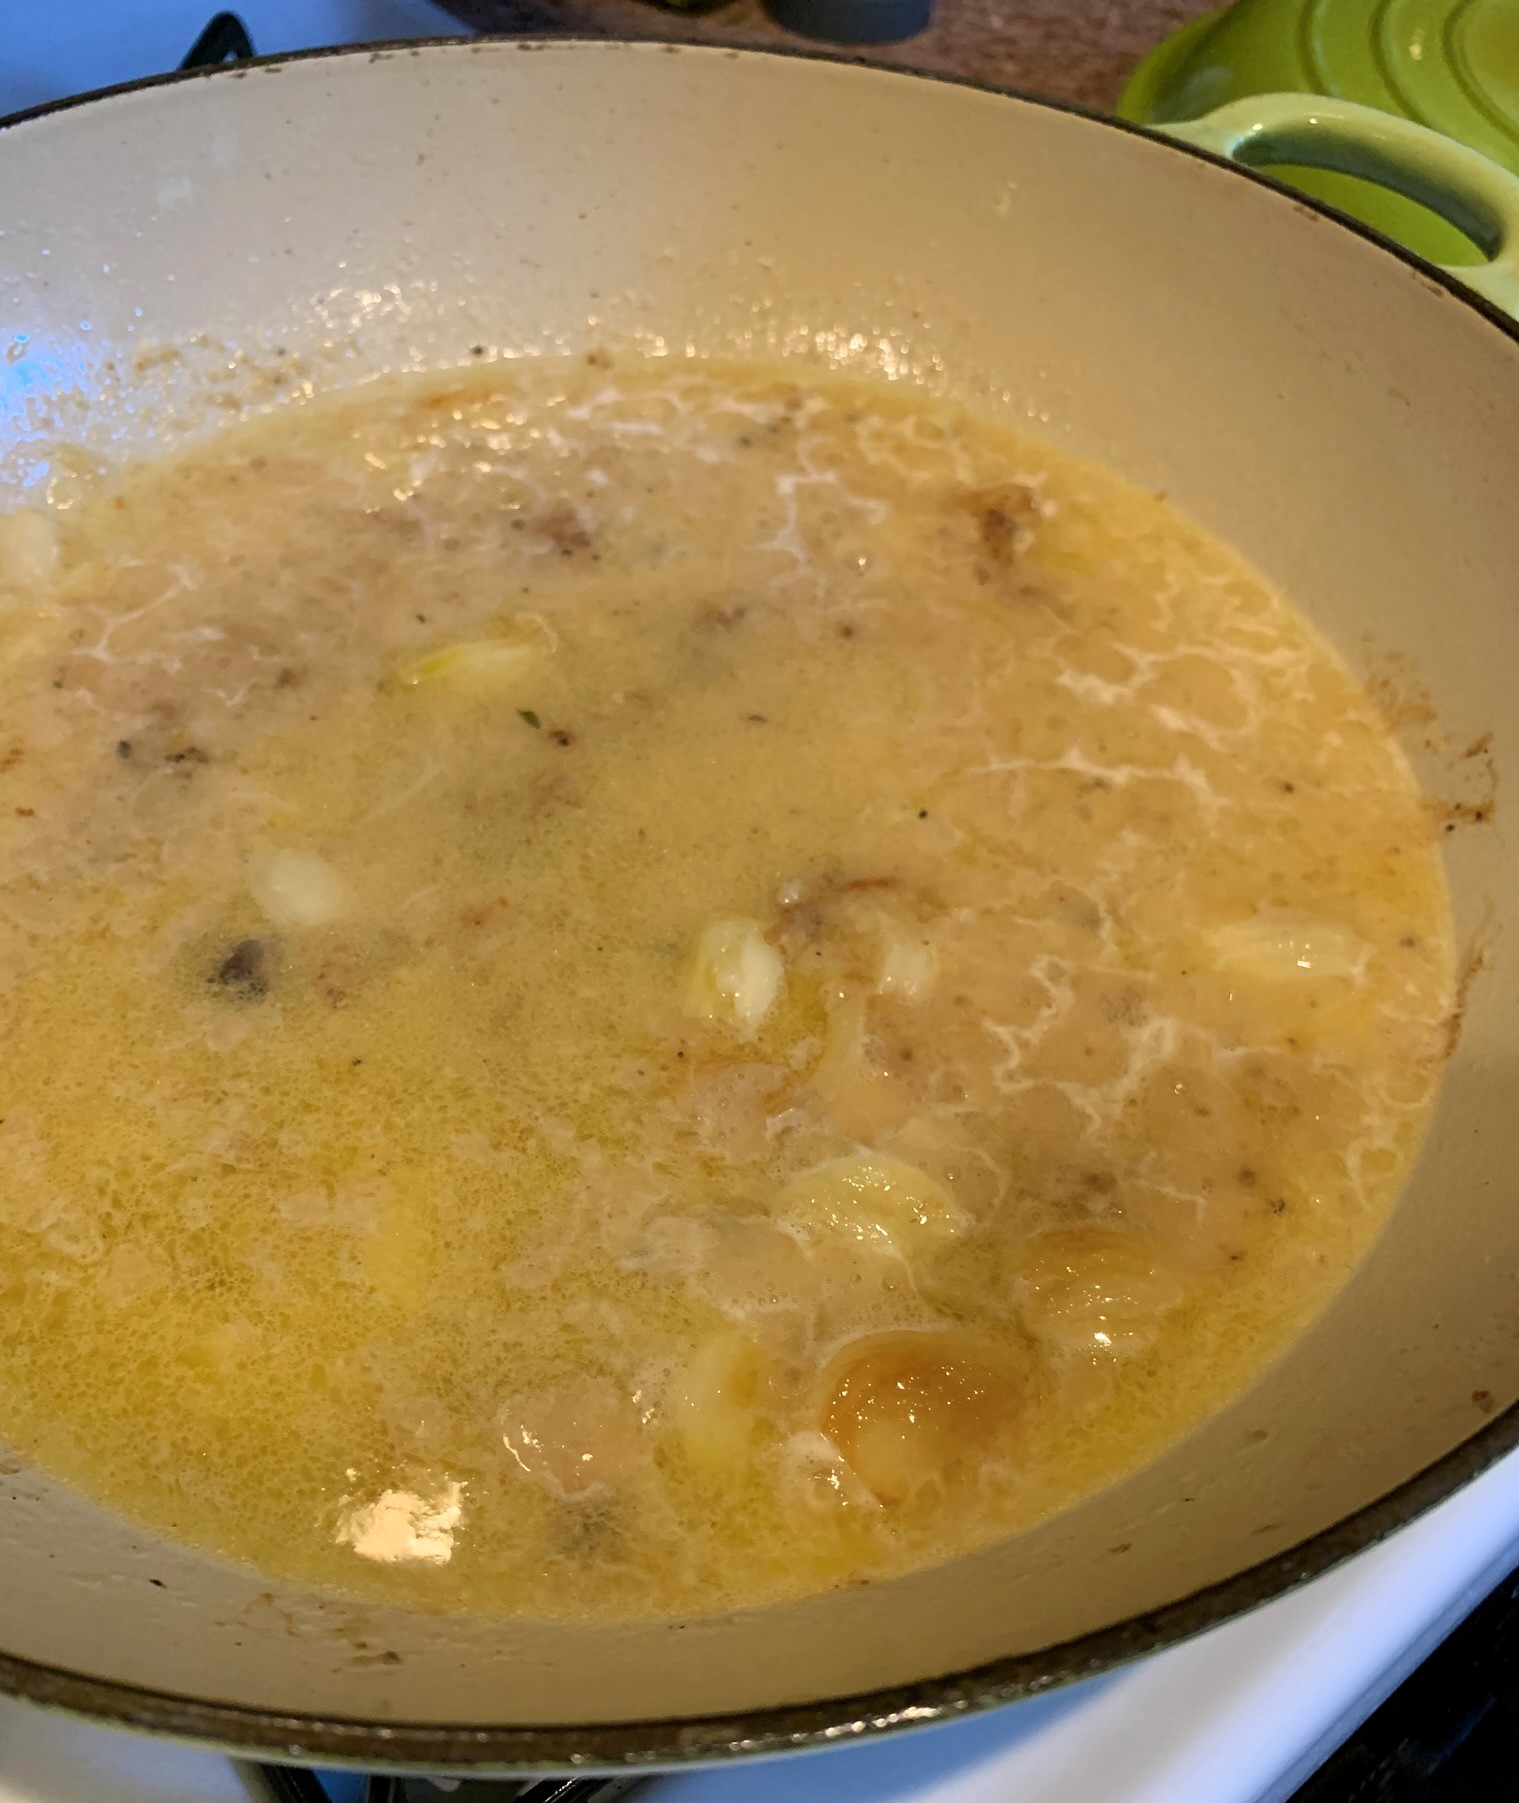
In a saucepot heat about 3 1/2 cups of the stock with the bay leaf to boiling. Add the rice, then cover the pot, reduce the heat to low, and simmer for 18 minutes or until tender. Discard the bay leaf.


While the rice cooks, place the poblanos under the broiler or on the hot grill and char evenly all over, about 15 minutes.

While the peppers and rice are working, scrape the corn off the cob. To do this efficiently, invert a small bowl and place it in the bottom of a large bowl. Stand the cobs on the inverted bowl and use a sharp knife to slice off the kernels; they will collect in the large bowl. If you are using frozen corn, pop it in the microwave to take the chill off: a couple of minutes on the defrost setting will do it. Drain and dry the defrosted corn by spreading it out on a clean kitchen towel.

Heat 2 tablespoons of the oil in a skillet over high heat. When the oil ripples add the corn, onions and jalapeno and toss until the vegetables char at the edges and the onions are tender, 4 to 5 minutes. Reduce the heat to medium-high and add the garlic, tomatoes, cumin, oregano and salt and pepper. Cook for another minute or two, then remove from the heat.

Place the cilantro, spinach, scallions, lime zest, the remaining 1/2 cup of stock, and the remaining tablespoon of oil in a food processor and puree into a coarse green paste.


Sprinkle the lime juice over the corn mixture.

Split the charred peppers open but not in half with a small sharp knife, then scoop out the seeds with a small spoon. Place the peppers in a shallow baking dish and stuff each pepper with lots of the corn mixture, mounding it out of the peppers. Top each with 1/4 cup cheese. Place the stuffed peppers back under the broiler to melt and char the cheese until bubbly and browned, a minute or two. 


Stir the green paste into the hot rice and serve with the peppers.

Wednesday, August 19, 2020

Rustic Chicken with Garlic Gravy

Rustic Chicken with Garlic Gravy is what we are talking about today. It tastes as fab as it looks:


First of all, it features the lowly chicken thigh. But, honestly the chicken thigh is super delish and affordable, so I encourage you to embrace the thigh!

The dish requires an oven and stovetop ovenproof pan with a lid. It starts on the stove, moves to the oven and makes a return appearance to the stovetop so that you can make the smooth and fabulous gravy that will atop the crispy chicken and your side of choice.  I often make it with mashed potatoes but have also rocked it out with rice, which is way less time consuming and lighter than mashed potatoes. So, whatever you prefer! I always serve a green veg with it as well. Earlier this summer I did asparagus and rice. This week I did mashed potatoes and broccoli rabe.

Just a side note: The recipe calls for 20 cloves of garlic, but I just use 10. I also frequently use olive oil instead of veg oil. And, I do sometimes omit the butter at the end because the sauce is very satisifying even without the butter.

I hope you enjoy making the recipe and dining on this wonderful dish!


Rustic Chicken with Garlic Gravy

From seasonsandsuppers

Makes 6 servings

2 Tbsp. cooking oil such as vegetable or canola

6 pieces skin-on/bone-in chicken thighs

Salt and freshly ground black pepper

20 cloves garlic, separated and peeled

2 Tbsp. all-purpose flour

3/4 cup dry white wine

1 cup chicken broth

1 1/4 tsp. fresh thyme leaves or 3/4 tsp. dried thyme leaves

2 Tbsp. butter


Heat the oven to 400 degrees Fahrenheit with the rack in the center of the oven.

In an oven-safe Dutch oven or oven-safe skillet with a lid, heat the oil over medium high heat. Dry the chicken pieces well by patting them with a paper towel. Sprinkle the chicken pieces with a bit of salt and pepper. Cook the chicken until well browned on all sides, about 8 minutes. Remove chicken to a plate. You can remove some of the fat in the pan if you have lots, but leave enough to cook the garlic in the next step.


Reduce the heat to medium, add the garlic and cook, stirring regularly until the garlic browns, about three minutes. Sprinkle the flour over the garlic and stir until combined. Return the chicken to the pot, cover, and bake for 15 minutes in the pre-heated 400 degree oven. If your pot or skillet doesn't have a lid, tightly cover the top with aluminum foil.


Remove the pot from the oven and put it on a burner. Be careful not to touch the hot pot! Remove the chicken pieces from the pot to a clean plate. Over medium-high heat, whisk in the wine and simmer for 1 minute. Whisk in the broth, thyme and a bit more salt and pepper, then reduce the heat and simmer, stirring regularly, until sauce thickens. Turn the heat off and stir in the butter. Taste sauce and add more salt and pepper, if it needs it. Add the chicken back to the pot to rewarm with sauce. Serve spooned over mashed potatoes, rice or pasta.

Please note: The Jersey Girl uses 10 cloves of garlic instead of 20. She also uses olive oil instead of vegetable oil. She also doesn't always add the butter at the end. 


Sunday, August 9, 2020

Tomato Sangwich 101

 I feel a bit ridiculous writing a recipe for the Tomato Sangwich. (Some people really truly call a sandwich a sangwich here in my parts. I can't tell you why. But it makes me laugh and I love it, so Sangwich stands.) But I realized that perhaps a classic Tomato Sangwich may be a total regional thing to my parts of South Jersey, and I should type this up as a public service to all of you who have not yet experienced the simple magic of a Tomato Sangwich. It truly is a standout of summer cuisine. 


Now my recipe below is literally just how I personally love it. 

I can recall my Poppop rocking a tomato sangwich out while whistling some tunes back in the day with just literally mayo, tomato, a pinch of salt on your totally standard sliced sandwich bread like Wonder or Stroehmann's. But see, the Jersey Girl is 100 percent a food snob, and sliced sandwich bread does not step foot into my cupboards. (Sorry, Poppop, and all y'all who love sliced sandwich bread.) You can of course make it on that, and the result is quite delish as the sandwich bread becomes all squishy and enveloped in the intoxicating juiciness of the Jersey tomato. But, yours truly prefers the amazing crustiness of a Kaiser roll. Why, you ask? The superior bread stands up to the simple contents of this sandwich. And it is the perfect vessel to hold the cheese, tomato, basil, mayo and seasoning. The bread softens, but not still too much. You still got the crust, you see? And because of that solid crust, it doesn't make a total mess. Although, don't expect to eat this all prim and proper unless you knife and fork it, which honestly I wouldn't. I would just chomp right in. 

For best results, let the sangwich hang out so that all the flavors mold together. Whatever you do, don't refrigerate the glorious tomato sangwich. I am known to chill my sangwich in a cooler until I am ready to unwrap into its glorious contents while poolside.

Happy summer!


Tomato Sangwich/Sandwich

Serves 1

1 crusty Kaiser roll, sliced in half

2 slices of favorite cheese such as provolone, pepper jack or American

1 medium fresh tomato, sliced 1/4-inch thick

5-6 fresh basil leaves

1 Tbsp. mayonnaise

Black pepper and salt to taste

Spread mayonnaise with a butter knife evenly onto the cut side of each roll half. Sprinkle evenly with black pepper.

Layer cheese slices onto one roll half. Evenly place tomato slices on top of cheese slices. Lightly season with salt. Evenly place basil leaves on top. Place other roll half onto the prepared roll half. Cut in half. For best results, let sandwich hang out for about 10 minutes before eating. 

Saturday, August 8, 2020

Lunchtime: Couscous and Tuna Salad

For Lent 2020, The Jersey Girl gave up lunchmeats - you know, your standard deli ham, sliced turkey, etc.

For one thing, I just needed the processed content and salt out of my life.

Though Lent has come and gone, I have stuck with this decision to ixnay deli fare from my palate. As a result, lunchtime has become much more interesting. And I feel so much better that the salt and fake-food factor of lunchmeat is no longer in my bod.

This Israeli Couscous and Tuna Salad from Barefoot Contessa is an ideal lunch for me, particularly on a bed of baby spinach or mixed greens.

Good Italian tuna is mixed up with a whole lot of thangs from the pantry. The thing is those actual items - olives, capers and red peppers - already come with a bit of salt in them. So, I have significantly cut the amounts of salt called for in this recipe. Truth be told, I often do that. I really only follow salt measurements for baking.

I cut this recipe in half and it stayed nice in the fridge for a couple of days for my lunch purposes.

Like I said, it rocks on a bed of greens and I top it with just a teaspoon of feta. I recommend cooking your Israeli couscous as the package recommends. This recipe was easy to cut in half (which is what I did), and it still made enough to last me for three lunches.


Israeli Couscous and Tuna Salad
Serves 6 to 8
From "Barefoot Contessa: Foolproof"
By Ina Garten

2 cups Israeli couscous (10 to 12 ounces)
2 (7-ounce) cans or jars Italian tuna, drained and flaked
2 tsp. grated lemon zest (2 lemons)
1/4 cup freshly squeezed lemon juice
1/2 cup good olive oil
3 Tbsp. capers, drained
1/2 cup pitted, oil-cured black olives, coarsely chopped (3 ounces)
1/2 cup jarred roasted red peppers, medium-diced (4 ounces)
2 tsp. minced garlic (2 cloves)
Kosher salt and freshly ground black pepper
1 cup chopped scallions (6 to 8 scallions)
1/4 cup julienned fresh basil leaves, lightly packed
Juice of 1/2 lemon


Bring 4 cups of water to a boil in a medium-size saucepan. Add the couscous and reduce the heat to very low. Cover the pot and simmer for 12 to 15 minutes, until the couscous is just tender. (I pull the pot halfway off the heat.) Drain in a colander.


Meanwhile, combine the tuna, lemon zest, lemon juice, olive oil, capers, olives, red peppers, garlic and 1 Tbsp. salt and 1 1/2 tsp. black pepper in a large bowl. Pour the hot couscous into the mixture and stir well. Cover and set aside for 10 to 15 minutes, stirring occasionally. Just before serving, stir in the scallions, basil, juice of the  1/2 lemon, and 1 more tsp. of salt. Taste for seasonings and serve warm or at room temperature.


Please note: The Jersey Girl uses way less salt than the Barefoot Contessa calls for in this recipe.


Monday, August 3, 2020

Pasta with a Kick

Easy recipes with lots of flavor. That's what summer cooking is all about. And highlighting what's in season, of course.

This Spaghetti with Tomatoes, Black Olives, Garlic and Feta Cheese is ready in minutes. Tomatoes and parsley are the stars of the show, with the salty punch of black olives, capers and feta as the sidekicks. This dish is amazing on hot summer nights.

Enjoy it with wine and some bread, and a little salad, of course!


Spaghetti with Tomatoes, Black Olives, Garlic and Feta Cheese
Serves 4

1 1/2 pounds tomatoes (about 3), seeded and cut into 1/2-inch pieces
1/2 cup Kalamata or other black olives, pitted
1/4 lb. feta cheese, crumbled
3 Tbsp. drained capers
3 Tbsp. chopped flat-leaf parsley
1/4 tsp. salt
1/4 tsp. freshly ground black pepper
3/4 lb. spaghetti
6 Tbsp. olive oil
3 cloves garlic, minced

In a large glass or stainless steel bowl, combine the tomatoes, olives, feta, capers, salt and pepper.


In a large pot of boiling, salted water, cook the spaghetti until just done, about 12 minutes. Drain.

Meanwhile in a medium frying pan, heat the olive oil over moderately low heat. Add the garlic and cook, stirring, for 1 minutes. Add the cooked pasta and the garlic oil to the tomato mixture and toss.


Sunday, August 2, 2020

Grammy's Chocolate Cookies

My son has an affinity for the old-timey soft chocolate cookies made by Archway that I find in the grocery store. They are pretty delish. 

But, I thought I could do better with a homemade variety. And I was totally correct. Grammy's Chocolate Cookies by Martha Stewart are soft, intense and chocolatey good. The flavor is so much deeper than those I buy at the grocery store.

These use a lot of sanding sugar. Definitely plan for a cup, but I probably used even more. The recipe doesn't have a measurement for the sanding sugar. I would have a few bottles on standby. I made mine blue and red. I thought they were fun colors to celebrate the Phillies returning to play! 

Be sure to chill the dough, but expect it to be very soft. Rolling is a messy process but just go with it. I used a small cookie scoop so that my balls of dough were consistent in size. 

I only baked 8 at a time on each baking sheet. I thought they needed a lot of space to spread out.

I brought these cookies to a pool party, and they were definitely a hit. I feel like they would be amazing with a scoop of ice cream.


Grammy's Chocolate Cookies
Makes about 3 1/2 dozen
From "Martha Stewart's Cookies"
By Martha Stewart

2 cups plus 2 Tbsp. all purpose flour
3/4 cup unsweetened Dutch process cocoa powder
1 tsp. baking soda
1/2 tsp. salt
1 1/4 cups (2 1/2 sticks) unsalted butter, room temperature
2 cups granulated sugar
2 large eggs
2 tsp. pure vanilla extract
Sanding sugar, for rolling

Sift together flour, cocoa powder, baking soda and salt into a bowl.


In the bowl of an electric mixer fitted with the paddle attachment, beat butter and sugar on medium speed until light and fluffy, about 2 minutes. Add eggs and vanilla, and beat to combine. Reduce speed to low, and gradually add flour mixture; beat to combine. Form dough into a flattened disk, wrap with plastic wrap, and chill until firm, about 1 hour.


Preheat oven to 350 degrees Fahrenheit. Shape dough into 1 1/4-inch balls. Roll each ball into sanding sugar. Place on baking sheets lined with parchment paper, about 1 1/2 inches apart. Bake until set, 10 to 12 minutes, rotating halfway through. Transfer to a rack to cool for 5 minutes. Transfer cookies from baking sheet to wire rack. Cookies can be stored between layers of parchment in an airtight container at room temperature up to 1 week.