Showing posts with label cookies. Show all posts

Thursday, January 20, 2022

White Chocolate Chip Cranberry Cookies


White chocolate and dried cranberries are a culinary union that will withstand the test of the time. Literal taste perfection.

These Soft White Chocolate Chip Cranberry Cookies from Sally's Baking Addiction are a delightful addition to your dessert table for any fall or winter celebration. They have a browned butter taste that will send you over the moon. The tartness of the cranberries and the smoothness of the white chocolate chips are such a fab combo. I will definitely make these again.

I used dark brown sugar for these. Be sure to not overcrowd your baking sheets. I did not use extra chips or cranberries for garnish.


Soft White Chocolate Chip Cranberry Cookies

From sallysbakingaddiction.com

3/4 cup (1.5 sticks to 170gunsalted butter, softened to room temperature

3/4 cup (150g) packed light or dark brown sugar (I use dark)

1/4 cup (50ggranulated sugar

1 large egg, at room temperature

2 teaspoons pure vanilla extract

2 cups (250gall-purpose flour (spoon & leveled)

2 teaspoons cornstarch (cornflour)

1 teaspoon baking soda

1/2 teaspoon salt

3/4 cup (135gwhite chocolate chips, plus a few extra for garnish

1 cup (140gdried cranberries, plus a few extra for garnish

1. In a large bowl using a hand-held mixer or stand mixer with paddle attachment, beat the butter, brown sugar, and granulated sugar together on medium speed until combined and creamy, about 2 minutes. Beat in the egg and vanilla. Scrape down the sides and bottom of the bowl and beat again as needed to combine.

2. In a separate bowl, whisk the flour, cornstarch, baking soda and salt together. On low speed, slowly mix into the wet ingredients until combined. The cookie dough will be soft and thick. Add the white chocolate chips and dried cranberries and beat on low speed until combined. Cover dough tightly and chill in the refrigerator for at least 1 hour and up to 3-4 days. Chilling is imperative to prevent the cookies from over-spreading.


3. Remove cookie dough from the refrigerator. If the cookie dough chilled longer than 3-4 hours, let it sit at room temperature for about 30 minutes. This makes the firm cookie dough easier to scoop and roll.

4. Preheat oven to 350°F (177°C). Line large baking sheets with parchment paper or silicone baking mats. Set aside.

5. As the oven preheats, scoop and roll dough, about 1.5 Tablespoons of dough each, into balls. The dough may be slightly crumbly, but it will come together as you work it with your hands. Arrange dough balls 3 inches apart on the prepared baking sheets.

6. Bake for 11-12 minutes or until lightly browned around the edges. The centers will still look soft. If cookies didn’t spread much, lightly bang the baking sheets on the counter a couple times while the cookies are still warm. They’ll stretch and deflate.

7. Allow cookies to cool on the baking sheet for 5 minutes. During this time, press extra white chocolate chips and dried cranberries into the warm tops. This is optional and only for looks. After 5 minutes, transfer to a wire rack to cool completely.

Cookies stay fresh covered at room temperature for up to 1 week.

Please note: The Jersey Girl did not use extra cranberries or chips for garnish. She did use dark brown sugar. 

Thursday, September 23, 2021

Chocolate-Dipped Brown Sugar Shortbread

 My son and I have decided that all Barefoot Contessa desserts are extremely decadent. Meaning: Eat one cookie and it sends you over the moon on a sugar high.

These Chocolate-Dipped Brown Sugar Shortbread Cookies are no exception. 


The recipe says the batch makes 30 to 36 cookies, but I got 45 out of one batch.

The recipe says you can bake two trays at a time, but I would do one tray at a time on my next go around. I ended up using three baking sheets. The one sheet that baked on its own produced the cookies with the best browning around the edges. Plus, they were sturdier.

Which leads me to my next finding: Dip the cookies fast and use a light hand. These cookies are delicate and are easily breakable. But, of course the baker gets to eat the rejects. Ha.

The dough was very easy to shape. It does not need to chill. It was not crumbly like a traditional shortbread dough that uses powdered sugar. The brown sugar component definitely makes the actual cookie extremely sweet.

The recipe calls for milk chocolate chips, but we roll with semi sweet or dark chocolate in this house, so I went with the semi sweet.

I omitted the nuts as I am deathly allergic. I was thinking of decorating with sprinkles but my son ixnayed that, and in retrospect I think that was a good call because I don't think they need anymore sweetness. Although, sprinkles would look cute. When I make them again - and I definitely will - I will still go no sprinkles. I'm sure pecans add a salty finish, but we can't do that here.

These were so much fun to bake and eat.

I hope my tips help you!


Chocolate-Dipped Brown Sugar Shortbread

From "Modern Comfort Food"

By Ina Garten

Makes 30 to 36 cookies

3/4 lb. (3 sticks) unsalted butter, at room temperature

1 cup light brown sugar, lightly packed

2 tsp. pure vanilla extract

3 cups all-purpose flour

1 tsp. kosher salt

For the chocolate coating:

1 cup milk chocolate morsels, such as Hershey's (6 ounces)

6 Tbsp. (3/4 stick) unsalted butter

1/2 cup toasted pecans, minced and lightly salted

Preheat the oven to 350 degrees. Arrange two racks evenly spaced in the oven.

Place the butter and brown sugar in the bowl of an electric mixer fitted with a paddle attachment and mix on medium speed just until the butter and sugar are combined so you don't whip a lot of air into it. With the mixer on low, add the vanilla and scrape down the bowl with a rubber spatula. In a separate bowl, sift together the flour and salt. With the mixer on low, slowly add the flour mixture to the butter and sugar mixture and mix just until the dough comes together.


Scoop out 1-ounce pieces of dough (about 1 Tbsp.), roll each one into a ball, then roll it into a 2 1/2-inch-long log. Place the logs 2 inches apart on two sheet pans lined with parchment paper and bake for 15 to 17 minutes, until the cookies start to brown around the edges and spring back when lightly touched. Set aside to cool on the pans.


For the coating, place the chocolate and the butter in a heatproof bowl and microwave on high for 30 seconds. Stir the mixture vigorously and continue to microwave in 30-second increments until the chocolate is just melted.

Drag half of the rounded top of each cookie through the chocolate and place it, chocolate side up, on a piece of parchment paper. While the chocolate is still warm, sprinkle on the pecans. Repeat with all the cookies. Set aside for at least 30 minutes for the chocolate to firm.

Please note: The Jersey Girl omitted the pecans due to a food allergy. Her batch yielded 45 cookies. She used three baking sheets instead of two. She used semi-sweet chocolate instead of milk chocolate. She melts the chocolate on the stove top instead of the microwave.


Sunday, August 2, 2020

Grammy's Chocolate Cookies

My son has an affinity for the old-timey soft chocolate cookies made by Archway that I find in the grocery store. They are pretty delish. 

But, I thought I could do better with a homemade variety. And I was totally correct. Grammy's Chocolate Cookies by Martha Stewart are soft, intense and chocolatey good. The flavor is so much deeper than those I buy at the grocery store.

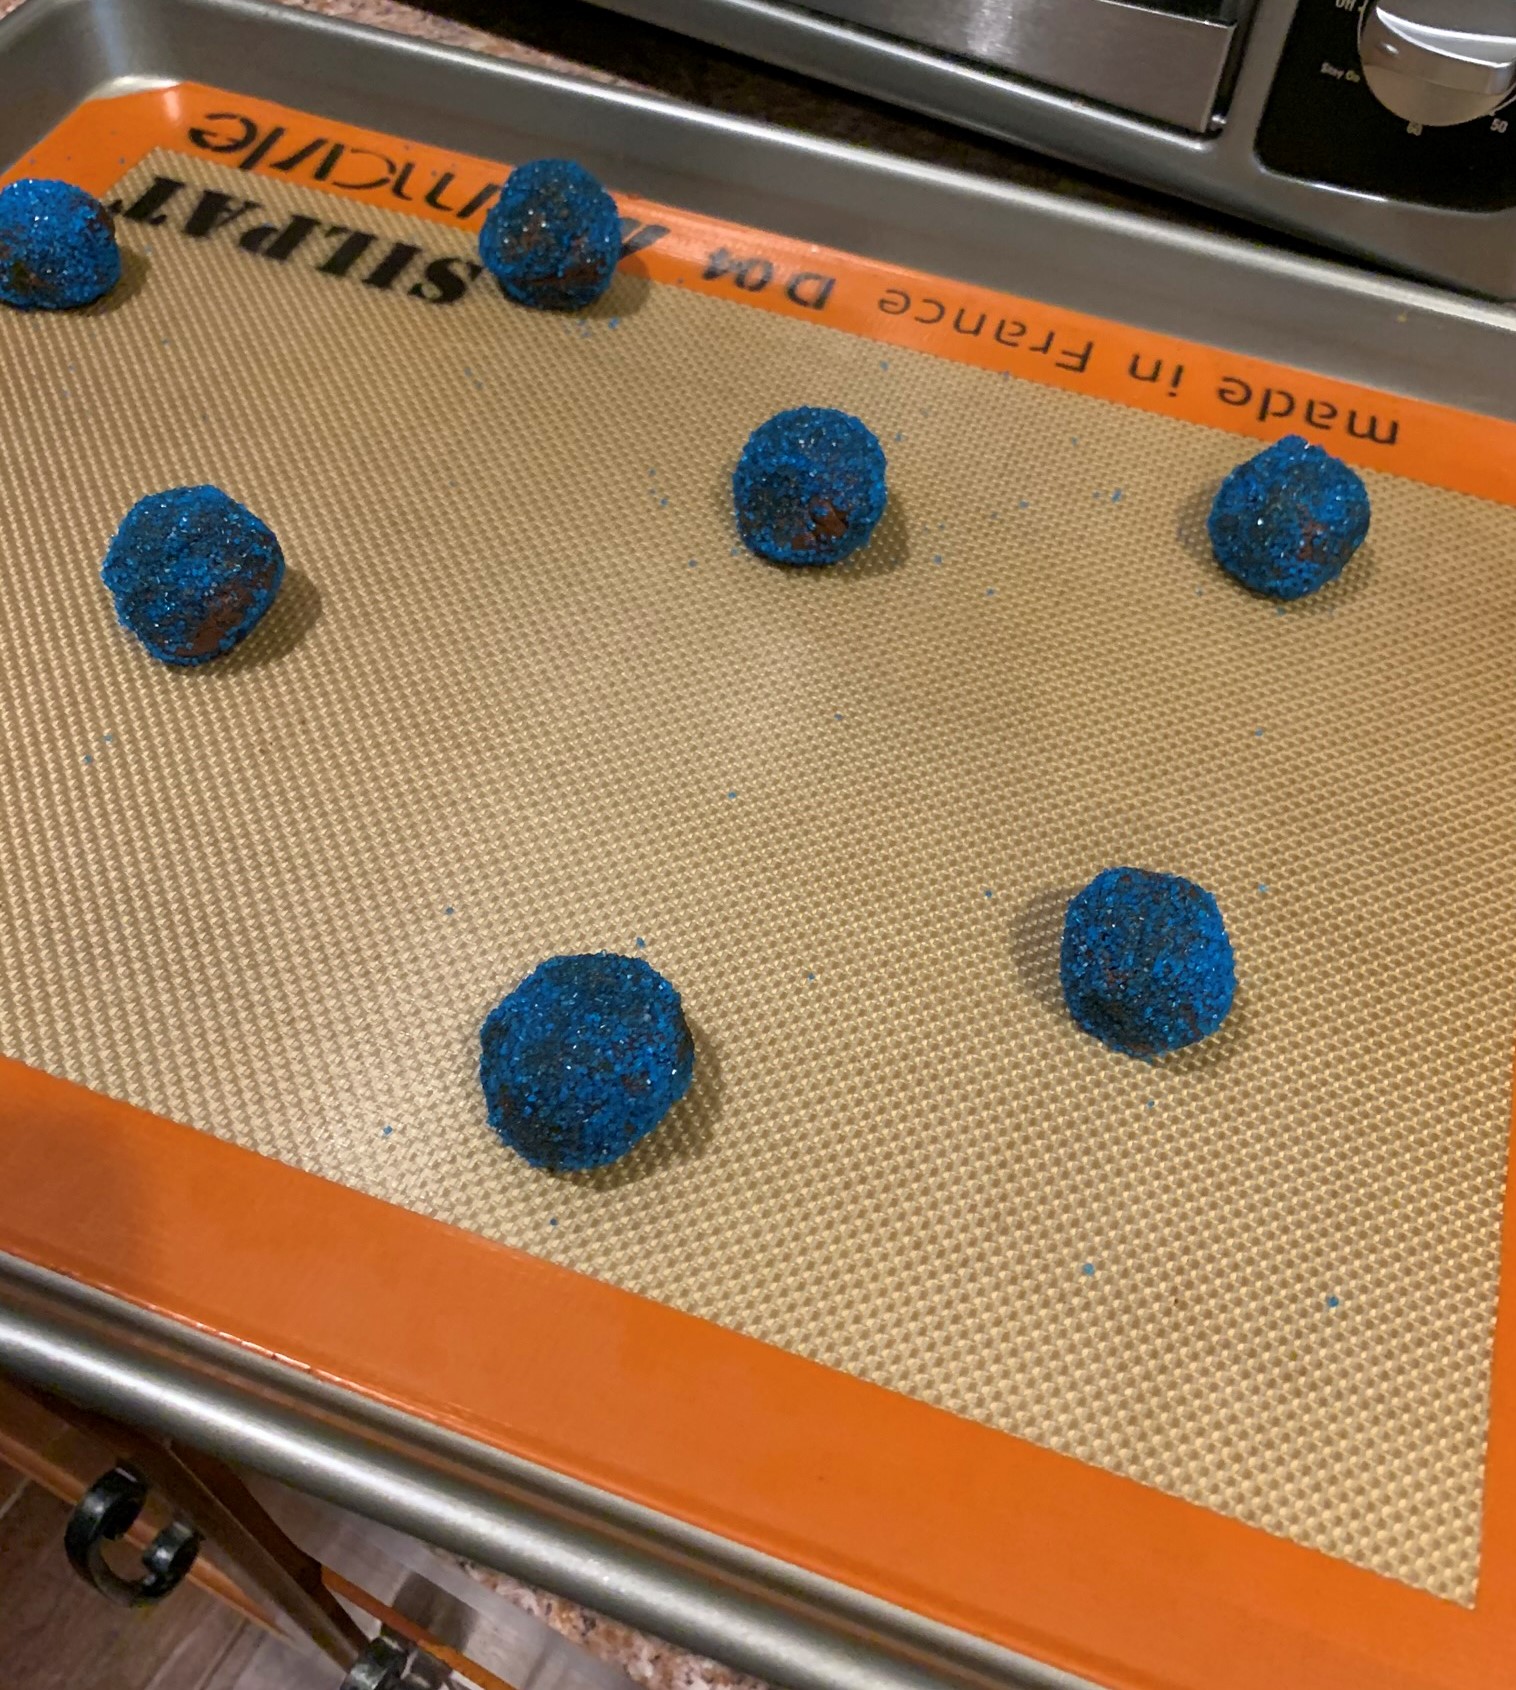
These use a lot of sanding sugar. Definitely plan for a cup, but I probably used even more. The recipe doesn't have a measurement for the sanding sugar. I would have a few bottles on standby. I made mine blue and red. I thought they were fun colors to celebrate the Phillies returning to play! 

Be sure to chill the dough, but expect it to be very soft. Rolling is a messy process but just go with it. I used a small cookie scoop so that my balls of dough were consistent in size. 

I only baked 8 at a time on each baking sheet. I thought they needed a lot of space to spread out.

I brought these cookies to a pool party, and they were definitely a hit. I feel like they would be amazing with a scoop of ice cream.


Grammy's Chocolate Cookies
Makes about 3 1/2 dozen
From "Martha Stewart's Cookies"
By Martha Stewart

2 cups plus 2 Tbsp. all purpose flour
3/4 cup unsweetened Dutch process cocoa powder
1 tsp. baking soda
1/2 tsp. salt
1 1/4 cups (2 1/2 sticks) unsalted butter, room temperature
2 cups granulated sugar
2 large eggs
2 tsp. pure vanilla extract
Sanding sugar, for rolling

Sift together flour, cocoa powder, baking soda and salt into a bowl.


In the bowl of an electric mixer fitted with the paddle attachment, beat butter and sugar on medium speed until light and fluffy, about 2 minutes. Add eggs and vanilla, and beat to combine. Reduce speed to low, and gradually add flour mixture; beat to combine. Form dough into a flattened disk, wrap with plastic wrap, and chill until firm, about 1 hour.


Preheat oven to 350 degrees Fahrenheit. Shape dough into 1 1/4-inch balls. Roll each ball into sanding sugar. Place on baking sheets lined with parchment paper, about 1 1/2 inches apart. Bake until set, 10 to 12 minutes, rotating halfway through. Transfer to a rack to cool for 5 minutes. Transfer cookies from baking sheet to wire rack. Cookies can be stored between layers of parchment in an airtight container at room temperature up to 1 week.


Sunday, January 5, 2020

The Lowdown on Chocolate Chip Cookies

There are two types of people: Bakers and non-bakers. I am 150 percent totally a baker.

So, I bring to you with great joy the most fantastic recipe for classic chocolate chip cookies ever. Of course, it's from my girl Betty Crocker. Look how gorg:


Perfect color and texture!

Now, I was born and bred on the chocolate chip recipe right on the back of the Nestle's chocolate chips. And sometimes, the final result was awesome but more often than not, the cookies were flat, sticking to the pan and not to my level of perfection that I often reach when baking.

So, I declared in November the Nestle's recipe was officially dead to me, and it was time to move on. Afterall, I do have a reputation to protect.

I also did extensive research on how to produce desirable chocolate chip cookies. Because I go big or go home on topics of which I obsess. So it seems this fact is key: Bake one cookie sheet at a time. All of these years I was doing the top-bottom switcharoo. Of course, baking one sheet solo adds more minutes to the whole process, but I do try to bake when I'm free as a bird (ha).

Also at issue is the number of eggs. Nestle's calls for two; Betty calls for one. I use extra large eggs in baking and cooking and life, so I think that is one reason the Nestle's recipe doesn't work out for me.

The Betty Crocker cookies turned out crispy on the outside, chewy and delicious on the inside and the best part was they totally did not stick to the pan upon removal. Score!


Chocolate Chip Cookies
From "Betty Crocker's Cookbook"
Makes 4 dozen cookies

3/4 cup granulated sugar
3/4 cup packed brown sugar
1 cup unsalted butter, softened
1 tsp. vanilla
1 egg
2 1/4 cup all purpose flour
1 tsp. baking soda
1/2 tsp. salt
1 bag (12 ounces) semisweet or dark chocolate chips (2 cups)
1 cup coarsely chopped nuts, if desired

Heat oven to 375 degrees Fahrenheit. In large bowl, beat sugars, butter, vanilla and egg with electric mixer on medium speed, or mix with spoon, until well blended. Stir in flour, baking soda and salt (dough will be stiff). Stir in chocolate chips and nuts.

On ungreased cookie sheets, drop dough by rounded tablespoonfuls about 2 inches apart. For perfectly sized and shaped cookies, use a #70 cookie scoop.

Bake 8 to 10 minutes or until light brown (centers will be soft). Cool 1 to 2 minutes; remove from cookie sheets to cooling racks.

Thursday, December 19, 2019

Nigella Christmas Chocolate Cookies

I've been wanting to make Nigella Christmas Chocolate Cookies for years. But this time of year is always so hectic, and each December would come and go and I just cranked out my cookie standbys: pizzelles, biscotti, ricotta, chocolate chips.

So this week, I changed all that and made a point to get to it already. Afterall, procrastination and putting tasks off is not how I roll.

These are like a chocolate shortbread drizzled with a chocolate glaze and sprinkled with your favorite Christmas sparkles or confetti.

I'm glad I made them. They are a nice surprise.

My batch made closer to 30 than the 24 listed in the recipe.

The recipe is featured in the Nigella Christmas cookbook. Nigella Lawson is one of my fave celebrity chefs and I collect all of her books. If you are not an avid reader of Nigella Lawson recipes, you may be surprised by her style as it is quite colorful and she adds a bit of her own commentary. I have listed her recipe exactly as it is written in the book.

My tips for the cookies that may have differed from her recipe are as follows:
1. I did not wear rubber gloves to roll out the dough. And it was totally just fine.
2. I did not remove my cookie sheet from the oven to place on a cold a surface. I don't even know what that means. Ha. Maybe her fancy kitchen has ice cold marble surfaces on which hot cookie sheets can be placed? I used a standard cooling rack on my common man formica.
3. My yield was greater than 24, so you may want to have 3 cookie sheets prepared.
4. Just in case it's not clear for you in her recipe, please bake each sheet one at a time.


Christmas Chocolate Cookies
From "Nigella Christmas"
By Nigella Lawson
Makes approximately 24

2 1/4 sticks (18 Tbsp.) soft unsalted butter
3/4 cup sugar
1/3 cup unsweetened cocoa powder
2 cups all-purpose flour
1/2 tsp. baking soda
1 tsp. baking powder

For the Festive Topping:
2 Tbsp. unsweetened cocoa powder
1 1/2 cups confectioners' sugar
1/4 cup boiling water, from a kettle
1 tsp. vanilla extract
Christmas sprinkles

Preheat the oven to 325 degrees Fahrenheit and line  2  cookie sheets with parchment paper.

Cream the butter and sugar in a bowl and when you have a light, soft, whipped mixture, beat in the 1/3 cup cocoa powder (sifting if it is lumpy) and, when that's mixed in, beat in the flour with the baking soda and baking powder. Or just put everything in the processor and blitz, if you prefer.

This mixture is very soft and sticky and I find it easiest to form the cookies wearing my disposable vinyl gloves, so pinch off pieces about 1 Tbsp. in size, roll them into balls, then slightly flatten into fat discs as you place them well spaced on your cookie sheet. You should get about 12 on at a time.

Bake each batch for 15 minutes; even though the cookies won't feel as if they've had enough time, they will continue to cook as they cool. They will look slightly cracked on top, and it's this cozy, homespun look that I love.


Remove the cookie sheet to a cold surface and let it sit for 15 minutes before transferring the cookies to a wire rack, with a sheet of newspaper under it to catch drips while topping them.

To make the topping, put the cocoa powder, confectioners' sugar, water and vanilla extract into a small saucepan and whisk over a low heat until everything's smoothly combined. Take off the heat for 10 minutes.


When the cookies are cool, drizzle each with a tablespoonful of chocolate glaze - to glue the sprinkles on in a minute - using the back of the spoon to help spread the mixture, though an uneven dribbly look is part of their charm. After you've iced 6 cookies, scatter with some of the Christmas sprinkles, and continue thus until all the cookies are topped. If you ice them all before sprinkling, you will find the cocoa "glue" has dried and the sprinkles won't stick on.

Wednesday, July 17, 2019

Peach Cobbler Cookies

A weird thing has occurred: I've lost my sweet tooth. Oh, the irony. A baker who eats one bite of dessert.

It's true, dear readers. As I've grown up, my desire for sugar has diminished. Good for the waist line, and even better for my friends and family who get all of my baked goods for themselves.

So, these Peach Cobbler Cookies are wonderful for peeps like me: Those who like a taste of something sweet, but you don't need a gigantic slice of pie or a three-scoop sundae. Just one cookie, and all is good in the hood. I especially feel this way in the summer. When it's 90-plus degrees, I really do not eat a ton.

These cookies are fabulous. The brown sugar and spices and such a nice background to the sweet peaches. They go wonderfully with a cup of coffee or a glass of wine.

Please check out my instructions on peeling peaches for the recipe listed directly below the cookie recipe.

I omitted the almond extract called for in the recipe because I am allergic. I also chopped my peaches on the small side so that they were evenly distributed throughout the batch. The recipe listed the yield is 4 1/2 dozen, but my batch made about 4 dozen. I baked my cookies on two cookie sheets at a time for exactly 16 minutes, flipping the sheets half way from top to bottom and bottom to top. These are especially wonderful warm, and they hold up very well for several days in an air-tight container.


Peach Cobbler Cookies
Makes: About 4 1/2 dozen
From "Taste of Home: Simple and Delicious"

1 cup butter, softened
1 cup sugar
1/3 cup packed brown sugar
1 large egg, room temperature
1 tsp. vanilla extract
1/4 tsp. almond extract
3 cups all-purpose flour
1 1/2 tsp. ground cinnamon
1 tsp. cream of tartar
1 tsp. baking soda
1/2 tsp. salt
1/4 tsp. ground nutmeg
1 cup chopped peeled fresh peaches

Preheat oven to 350 degrees Fahrenheit. In a large bowl, cream butter and sugar until light and fluffy.

Beat in egg and extracts. In another bowl, whisk flour, cinnamon, cream of tartar, baking soda, salt and nutmeg; gradually beat into creamed mixture. Stir in peaches.


Drop cookie dough by tablespoonfuls 2 inches apart onto parchment-lined baking sheets.


Bake until cookies are set, 14-16 minutes. Remove to wire racks to cool. Store in airtight container.


Please note: The Jersey Girl omitted almond extract due to a food allergy.


How to Peel a Peach
1. Bring a pot of water to a roiling boil.
2. With a slotted spoon, drop in your peaches gently.
3. Cook in the rapidly boiling water for 2 to 3 minutes.
4. Remove with slotted spoon and drop into a bowl of ice water.
5. When cool enough to handle, peel the skin off with your finger tips.
6. Pit the peach by splitting it open if you can. Remove the pit with your fingers or a spoon.


Wednesday, December 17, 2014

Confessions of a Pizzelle Guru

Forget gift shopping, house decorating, feeble attempts at wrapping boxes while stalking the front door on an hourly basis hoping that the UPS man or FedEx man or some man has arrived with all of the freaking items I ordered three weeks ago. And don't even get me started on that crazy-ass Elf on the Shelf/Big Brother who I forget to move EVERY NIGHT. And Christmas cards. I mean really, America. Are we just effing insane?!?

Truth: Baking and cooking are the only holiday chores that do not make my blood pressure rise. So it is with great joy that I have entered the week of creating cookie deliciousness.

Elvis on the stereo, leopard ho-ho-ho hat slightly askew, wine on the side and the kid tucked snug in his bed, visions of trains and Legos dancing in his head. Now, this. This the Jersey Girl can deal with.

So here goes with my pizzelles. If you don't know what a pizzelle is, you've obviously never rocked out Christmas in Jersey. It's a traditional Italian waffle cookie, or as my big boy Evan calls them, snowflake cookies.


According to legend, I mean my very opinionated family, the best pizzelles are thin as paper and are so delicate and crispy that you must handle them with the utmost level of care.

The original recipe can be found on a vanilla-stained, time-worn faded light blue index card that was always stowed away in my Mom's index-card recipe box on the top shelf of her corner kitchen cabinet. The one with the lazy-Susan, above the coffee pot.

As is the case in many of the gems you will find in the box, now located in Florida, the "recipe" is merely a list of ingredients in no particularly important order. But as we know, nothing can be left to chance when baking. It's all about instinct. Precision. A feeling.

Of course, I will share with you my process. But, I must warn you dear readers, your pizzelles won't ever match mine. Not because of my fine baking prowess or stellar kitchen skills. No, sir. You see, when my parents left our childhood home for sunnier skies down south, my Mom would sneak into my house many of her "treasures." Pink Santa Claus circa 1985, harvest gold Tupperware circa 1972 and a pizzelle iron circa older than dirt. It is magical. Truly. I am completely convinced that the only reason my pizzelles are anything to write home about is because they are made on the gadget that I have treasured for my entire life.


Pizzelles
6 extra large eggs at room temperature
3 1/2 cups flour
1 1/2 cups sugar
1/2 lb. margarine melted and cooled (2 sticks)
4 tsp. baking powder
2 Tbsp. vanilla extract or anise

Preheat pizzelle iron.

In a large bowl, sift together flour and baking powder.

In a large mixer fitted with the paddle attachment, beat sugar and melted margarine until smooth. One at a time, add eggs and continue beating on medium-low speed. Add vanilla or anise (I use vanilla). Add flour mixture a cup at a time while mixer is beating slowly. Stop occasionally to scrape sides. Continue until flour is all completely added.

When ready to bake, place one teaspoon on each side of pizzelle iron. Press down iron for about 60 seconds. Remove from iron with the help of a fork. Lie flat on paper towels to cool. Once cool, the pizzelles can be piled up to make space for more.


Sunday, March 23, 2014

The Cookie of All Cookies

It's not easy staying so svelte and glamorous. Obviously, the Jersey Girl is THE expert on the matter.

Six months since my last hair appointment. Oh yeah.

Five YEARS since I've strutted my stuff in a gym. Who's counting?

And my last full night of beauty sleep uninterrupted by a screaming toddler. Um, I'll get back to you. Ever since the daylight savings switch my day-to-day is hazy.

Truth be told, people REALLY do want to know how the Jersey Girl is able to kick it being extra small what with my love of food, booze and sarcasm. Not to mention my proximity to age 40. I'm not there yet, world. Hold your damn horses!

It's pretty much a failproof five-day-a-week formula: Infrequent eating and never sitting. Add in a bunch of chasing a toddler, cleaning a sizeable house and pretty much being a maniac during all working and non-working hours, and you have yourself down to your fighting weight circa high school junior year.

Look, my job keeps me on my toes: both the paying one and the mom one. And being a one-woman show means that my food intake is usually the lowest priority of my day. Is this wise, healthy or advised? Hell to the no. But, it's the Jersey Girl's reality.

On the plus side, I can totally rock a bikini while kickin' it at the Jersey shore. Yay!

And, if I want a cookie, a cookie I shall have.

But not just ANY morsel of chocolatey goodness will do. No, sir. If you're going to indulge, INDULGE with the best: Nigella!

These are THE best chocolate chip cookies in the whole entire land. 

The recipe claims that this makes 12 monster cookies, but I always get at least 18 monster cookies. I use three lined baking sheets. And I eat one of these with a big glass of red wine and no guilt. Cheers!


Totally Chocolately Chocolate Chip Cookies
From "Nigella Express"
By Nigella Lawson

4 oz semisweet chocolate
1 cup flour
1/4 cup unsweetened cocoa, sifted
1 tsp. baking soda
1/2 tsp. salt
1/2 cup (1 stick) butter
1/2 cup light brown sugar
1/4 cup granulated sugar
1 tsp. pure vanilla extract
1 egg, cold from the fridge
2 cups semisweet chocolate morsels or dark chocolate chips

(Makes 12)

Preheat the oven to 325 degrees Fahrenheit. Melt the 4 ounces of chocolate.

Measure the flour, cocoa, baking soda and salt into a bowl.

Cream the butter and two sugars in another bowl with a mixer. Add the melted chocolate and mix together.

Beat in the vanilla extract and a cold egg, and then mix in the dry ingredients. Finally, stir in the chocolate chips.

Scoop out 1/4 cup sized mounds - an ice cream scoop and a palette knife are the best tools for the job - and place on a lined baking sheet about 2 1/2 inches apart. Do not flatten them.

Bake for 18 minutes, testing with a cake tester to make sure they come out semi-clean and not wet with the cake batter. If you pierce a chocolate chip, try again.

Leave to cool on the baking sheet for 4-5 minutes, then transfer them to a cooling rack.


Friday, June 29, 2012

That's Just How I Roll


Snickerdoodles are filled with cinnamony goodness. Last week, Evan and I bestowed a tin of these old-timey cookies to two of our most fave old-timers in the whole entire universe: Mommom and Poppop Sacco.

Yes, Evan is blessed with four great grandparents still going strong in their 90s. God bless. Even better, three of his great grandparents live five minutes away right here in H’town while his Great Poppop Ed lives about 30 minutes from our town. Visits bring many smiles to the young and the old, so we love stopping by for a little catching up.

While they say toddlers and seniors need their routines, the Jersey Girl decided to shake things up a bit with my recent visit to Casa di Mommom and Poppop. Oftentimes, Mommom and Poppop get one of my fabulous Sour Cream Coffee Cakes, but this go-around, I thought some Snickerdoodle action was in order. Cinnamon is involved in both treats, so I reasoned, “What’s the worst that could happen?” It’s not like I’m changing Mommom’s program or moving Poppop’s newspaper.

Thankfully, my gambling gal ways paid off: The Snickerdoodles were a hit with the gramps. Mommom, one of my lifelong inspirers of being a fab baker/cook, was fascinated with the perfect circular shape of my Snickerdoodles. She thought for sure that I sliced the dough into exact same-size rounds, meticulously measuring each one, when in fact I rolled the chilled dough into balls and then swished them around in a bowl of cinnamon sugar completely and totally eyeballing the situation. It ain’t rocket science.

Don’t get me wrong: Baking is totally based on rhyme, reason and order. Accuracy is my first, middle and last name when it comes to measuring. But baking also requires a sense of patience and calm and joy, which is why I SO love rocking out with my cake tins and such.  That sense of urgency which takes over our lives during the day-to-day goes out the window when baking.

So next time you feel like you’re going to flip your lid, try baking these puppies:


From “Better Homes and Gardens Cookbook”
Makes 36 cookies

½ cup butter, softened
1 cup granulated sugar
¼ teaspoon baking soda
¼ teaspoon cream of tartar
1 egg
½ teaspoon vanilla
1 ½ cups all-purpose flour
2 tablespoons sugar
1 teaspoon ground cinnamon

In a medium mixing bowl beat butter with an electric mixer on medium to high speed for 30 seconds. Add the 1 cup sugar, baking soda, and cream of tartar. Beat until combined, scraping sides of bowl occasionally. Beat in egg and vanilla. Beat in as much of the flour as you can with the mixer. Using a wooden spoon, stir in any remaining flour. Cover and chill in the refrigerator for 1 hour.

In a small mixing bowl combine the 2 tablespoons sugar and the cinnamon. Shape dough into 1-inch balls. 
Roll balls in the sugar-cinnamon mixture to coat. 


Place 2 inches apart on an ungreased cookie sheet.


Bake in a 375 degree F oven for 10 to 11 minutes or until edges are golden brown. Transfer cookies to a wire rack; cool. Makes about 36 cookies.


Please note: The Jersey Girl uses extra-large eggs.


Here are links to more of my fave cookie recipes:


Chocolate Thumbprints - These are magnificently awesome!!

Double Chocolate Chip Cookies - These are the William-Sonoma ones. The Nigella ones are AWESOME. I'll have to post them for all y'all.

Ricotta Cookies - A staple at all Jersey Girl Family Functions.


Monday, December 20, 2010

Fa La La La La

I’ve officially joined the ranks of a group of person I vowed never to become: Those who send Christmas cards of their offspring.

This phenomenon part fascinates me/part annoys me. Why do we think all of our friends and acquaintances want pictures of our little childrens and then big childrens? Are we all THAT self-absorbed?

Now, don’t get me wrong: I love receiving pics of my fab nieces and nephews and the children of close friends and family and my piano students. They always bring a smile to my face. And, I save the pics for years upon years upon years.

But doesn’t it crack you up when you get Christmas cards from people 10 times removed from your life? No? This is just my hangup?

Thank God the whole check-out-my-awesome-kid-in-reindeer-sweater motif wasn’t a trend when I was a child because if my Mom and Dad wanted to put my mug on a Christmas card, I would no doubt answer with a, “Bitch, please.” Or, at least I would have said that inside my truck driver-language filled head.

I asked my sister Monica what the age cutoff is with kiddies in Christmas cards. She had no idea. Do I mortify my son throughout his entire life or just the pre-10 years? Does this madness stop in high school? College? During post-graduate studies? Anyone? Bueller?

Meanwhile, The Husband dropped a major bombshell on me: He wants us to send out a family portrait for next’s year’s Christmas card.

Seriously.

So, here’s my hypocritical blog shot of Baby Evan decked out in Ho Ho hat. No, this is not The Christmas Card Photo, but it is from the holiday photo shoot and it came in a close second. And, well, I quite love this photo. It is so cute I can’t stand it. I did post it on my Facebook page, and now I’m sharing it with my blog peeps.

And, please do not call Child Protective Services on me due to my bambino’s nakedness: There was warm and snuggly blanket on hand to cover him up in between takes.


Love.

Yesterday, Baby Evan let his Momma get on with her Christmas baking. You know, if it wasn’t Christmas time, I would feel quite normal. It’s just that getting all the Christmasy stuff done – including sending Christmas cards – is quite overwhelming immediately after having a super cute and cuddly baby, because all I want to do is stare and hold my cute and cuddly baby.

But, Christmas baking is my most fav thing of all the holiday chores. Shopping, too. Wrapping and card sending, well, I could do without.

I’m sharing with you a recipe for Crisp Chocolate Bites. I love these for Christmas because they are covered in powdered sugar, which resembles snow in my humble opinion. Perhaps, you can tell from my photo, which pales in comparison to the shots taken by The Husband.

My rules for Christmas baking are as follows: The Christmas tree must be all aglow and Elvis’ holiday tunes must be pumping through your veins. Plus, have all your ingredients out and clean up as you go along. Oh, wait those are the cooking rules set by my seventh grade home ec teacher. (Yes, I went to school when they actually had home ec.) I explained all of this to Baby Evan, who most likely cooed or drooled in response, and then dozed off to the sounds of “Blue Christmas.”


Crisp Chocolate Bites
From Williams-Sonoma Cookies

6 Tbsp. (3 oz/90 g) unsalted butter, cut into pieces
2 oz (60 g) unsweetened chocolate, chopped
1 cup (8 oz/250 g) granulated sugar
1 large egg
1 tsp. vanilla extract (essence)
¾ cup (4 oz/125 g) all-purpose (plain) flour
¼ cup (3/4 oz/20 g) unsweetened Dutch-process cocoa powder
½ tsp. baking soda (bicarbonate of soda)
¼ tsp. salt
½ cup (2 oz/60 g) confectioners’ icing sugar

Lightly grease 2 baking sheets or line with parchment (baking) paper. Set aside.

In a small saucepan over very low heat, combine the butter and chocolate. Cook, stirring occasionally, just until they are melted and the mixture is smooth.

Pour the chocolate mixture into a large bowl and let cool slightly. Stir in the granulated sugar until evenly moistened. Add the egg and vanilla, beating until light and fluffy.

Sift the flour, cocoa, baking soda and salt together onto a sheet of waxed paper. Gradually add the flour mixture to the chocolate mixture and stir to combine. Cover and refrigerate until firm, about 1 hour.

Preheat the oven to 375 degrees Fahrenheit (190 degrees Celsius). Remove the cookie dough from the refrigerator. Shape the dough into ¾-inch (2 cm) balls and roll in the confectioners’ sugar to coat completely. place the balls about 1 ½ inches (4 cm) apart on the prepared sheets. Bake the cookies until puffed and cracked on top, about 12 minutes. They may appear underdone in the center but will turn crisp as they cool. Let cool on the sheets for 2-3 minutes, then transfer the cookies to a wire rack to cool completely.

Makes about 3 ½ dozen cookies.